What Is a Heat Pump and How Does It Work?

You may have heard the term “heat pump” from your home inspector or HVAC technician, but aren’t really sure what it means. Heat pumps look like an air conditioning unit, and they do work like A/C for cooling, but they also work in reverse to heat your home. To help you understand, let’s discuss exactly how they work and what the major components and benefits of a heat pump are.

 What is a heat pump?

A heat pump works like an air conditioner during the cooling season. In the heating season, it can be switched to work in reverse. Simply put, when in cooling mode, it cools the inside and pumps the heat to the outside of your home. When in heating mode, the heat pump pulls heat from the outside environment and pumps it to the inside of your home.

 In technical terms, a heat pump basically transfers heat from one environment to another. This is done when the heat pump is part of your HVAC system. The heat pump does not generate heat, but rather pulls the heat from the outside air, a water source, or a geothermal source.

 Even in the winter, there is latent heat outside. However, for most systems, a heat pump using outside air does not operate efficiently when the temperature drops below 40 degrees.

 What are the benefits of a heat pump?

Heat pumps only use electricity to move air through the system. This makes them efficient and cost-effective. Depending on where you live, compared to an electric resistance furnace or baseboard heaters, a heat pump can reduce the electricity used to heat by as much as 50%. Newer high-efficiency heat pumps do a better job at reducing humidity as compared to an air conditioning system. For more information on heat pumps and to see how they may help you save energy, visit this energy.gov website.

 What are the components of a heat pump?

There are several components to a heat pump system. Below is a description of the major parts.

 ·         Exterior Unit - The exterior unit of the heat pump is typically called the air conditioning or A/C unit. This is the familiar unit you see that has the housing, fan, copper coil system, and cooling fins. The fan pulls air in through the copper coils and blows it out of the top of the unit.

·         Interior Unit - The interior unit of the heat pump is typically a part of the furnace system or an air handler. This unit also has a copper coil system and a fan to move air through the coils as well as the distribution ductwork of your home. 

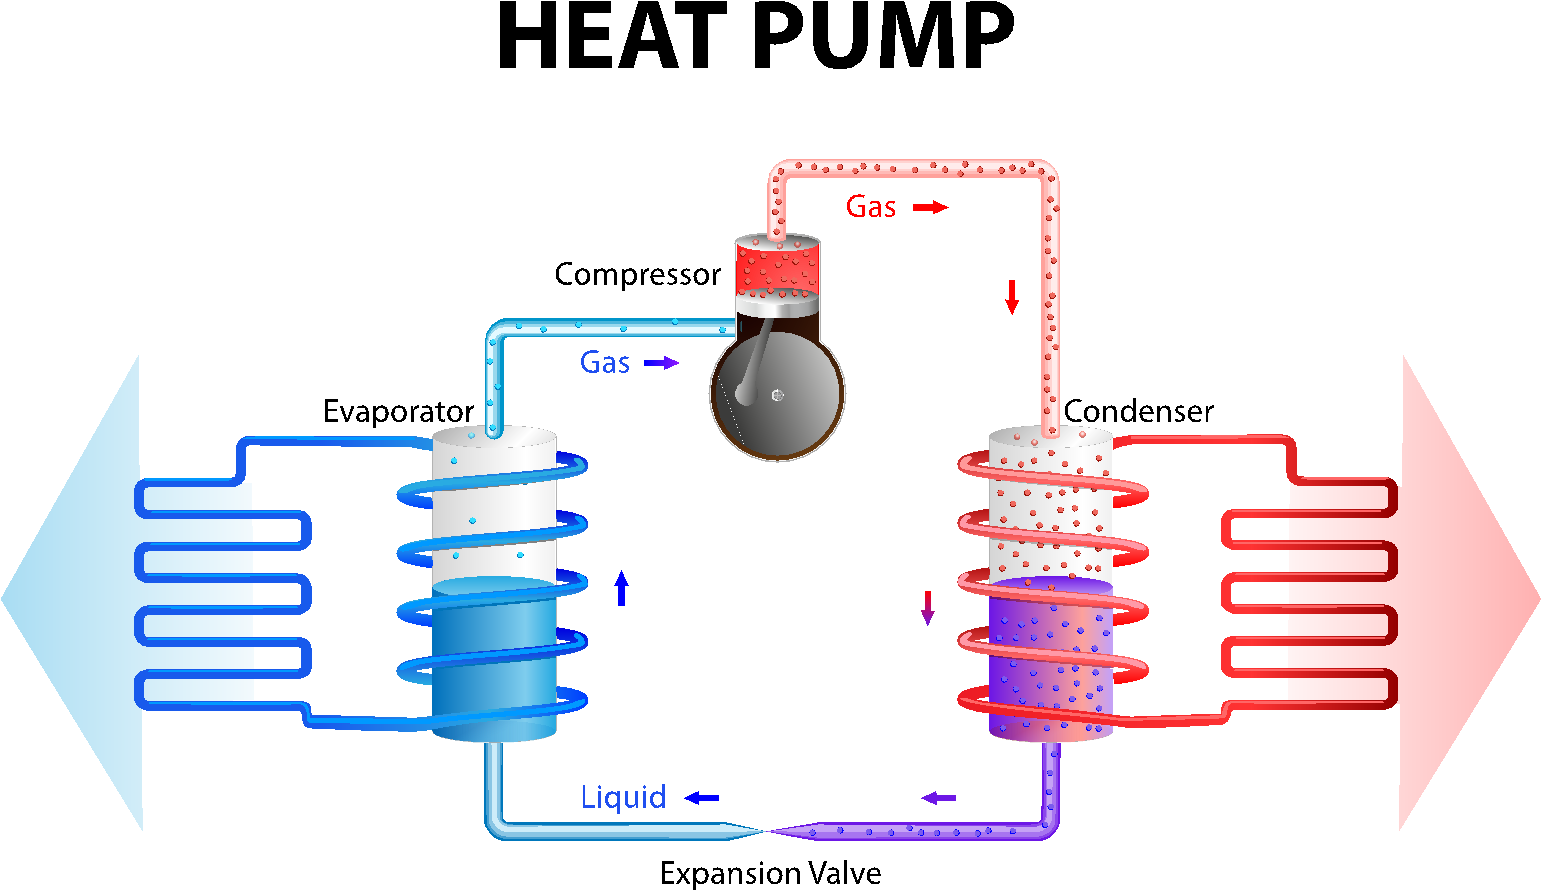
·         Compressor - As the refrigerant moves through the compressor, the pressure is increased, which makes the refrigerant hot. This pressure also helps to move the refrigerant through the coil system.

·         Evaporator - The evaporator is the set of coils housed within the interior unit.

·         Condenser - The condenser is the set of copper coils housed within the exterior unit.

·         Reversing Valve - The reversing valve switches the flow of the refrigerant through the system. In one direction, the system functions as an air conditioner; in the other direction, the system functions as a heat pump.

·         Expansion Valve - The expansion valve regulates the refrigerant pressure and temperature within the system.

·         Refrigerant - The refrigerant is the liquid or gas that is contained inside the copper coil system. The coil system is a continuous loop connecting the exterior and interior units. The refrigerant may also be called freon, 410A, or R22. Although it is called a refrigerant, it is actually a liquid or gas that transfers heat or cold. It can easily change temperature from very cold to very hot by adjusting its pressure.

 How does a heat pump work?

In general, a heat pump uses electricity and its components as a way to transfer heat from one environment to another through a medium we call refrigerant. Using a fan, the heat or cold within the refrigerant is transferred from the coil system to the air around it. Along with the fan, a distribution of ducts moves the air to the desired areas of your home.

 Cooling Mode

In the cooling mode, the refrigerant moves through the compressor in the outdoor unit coil system. This creates a higher pressure in the refrigerant and converts it from a liquid to a very hot gas.

 The coil system in the exterior unit functions as a condenser, and the fan in the exterior unit pulls cooler air through the coil system. The refrigerant absorbs the lower temperature, which lowers the refrigerant pressure and transfers the heat to the exterior atmosphere.

 As the refrigerant travels through the system, it passes through the expansion valve, which regulates the pressure. The lower pressure converts the refrigerant back to a liquid, which becomes very cold. As the cold liquid flows through the interior unit’s evaporator coil, the fan moves warm air across and through the coils, cooling and dehumidifying the air, which is then distributed throughout the home.

 Heating Mode

When in the heating mode, the reversing valve is switched, thus reversing the entire system. The refrigerant travels through the compressor, making it a hot gas. As the hot gas travels through the interior unit coil system, the fan blows air across the coils to heat the air.

 The refrigerant absorbs the cooler indoor air through the coils and the pressure lowers. As the refrigerant travels through the expansion valve, it becomes a cold liquid.

 As the refrigerant passes through the coil system of the exterior unit, the fan draws warmer air through the coils and back through the compressor, making it very hot.

 Summary

Heat pumps are an efficient way to heat and cool homes, but they have their limits depending on if they are using air, water, or geothermal as their heating or cooling source. If using air in the northern states, it is not uncommon for a heat pump system to have a backup electric induction heat source in the furnace for when temperatures are consistently below 40 degrees.

 At HomePro Inspections, our home inspectors are trained to inspect heat pump systems and their operation. Any issues are documented in your home inspection report and recommended for resolution by a qualified professional.

 Visit our website to learn more or to schedule your home inspection in the Rochester, Owatonna, and Faribault, MN areas. You can contact us today at (507) 202-8942 or utilize our online “Schedule Now” feature to set up an appointment.

Understanding Reverse Polarity in an Electrical Outlet

Reverse polarity may not seem like a big deal, but it is. What this means is that an electrical outlet or light fixture is wired backwards. There is a “hot” side and a “neutral” side to these electrical fixtures, and it is important that the wiring is connected correctly. Although the circuit will still work if wired backwards, having the hot and neutral reversed can create a dangerous situation most people are never even aware of.

  How do electrical outlets and light fixtures work?

We should probably understand how an electrical outlet and light fixture work before moving on to reverse polarity. Basically, they are designed for electricity to run through them in a certain way. Let’s use the kitchen sink as an analogy. Water is supplied by the faucet (hot side) and exits through the drain (neutral side).

 Electrical Outlets

When you look at an electrical outlet, you will notice that one of the slots is longer than the other. The slot orientation determines the polarity. The shorter slot is the hot side, also known as the ungrounded conductor. The long slot is the neutral side, also known as the grounded conductor. The little “doghouse” at the bottom is the ground wire, which is literally connected to the earth. If the electrical outlet is wired correctly, the hot side will have a black or red wire attached to it, and the neutral side will have a white wire attached to it. The ground is typically a bare copper wire.

 Why does reverse polarity matter?

Let’s say, for example, that you have a lamp plugged into an outlet. In a properly wired electrical outlet, the hot wire is connected to the lamp’s switch. Until the switch is turned on, there is no power to the lamp socket. Once the switch is turned on, the power will travel through the hot wire to the lamp socket, lighting the bulb, then to the neutral conductor.

 Wired backwards

If the electrical outlet is wired backwards, meaning reverse polarity, the hot wire is connected to the socket, not the switch. This means that the socket would have power all the time, even if the switch is turned off. In the event that someone is changing a light bulb, all it would take to complete the circuit to ground and get a shock is to touch the metal in the light socket.

 Example

Another example would be your toaster. If it’s plugged into an electrical outlet that has reverse polarity, the power would go directly to the toaster coils (the part that gets red hot when toasting), even when the toaster is switched off. So, you put in some bread, turn the toaster on, the circuit is completed, and all seems fine. Your bread toasts, the switch turns off, and the coils are no longer red. But let’s say your toast gets stuck. You grab the butter knife, slip it into the toaster to dislodge the toast, but accidently come into contact with one of the coils. Boom! You get a shock! You have become the ground conductor! If the electrical outlet was wired properly, the power would be at the switch and the coils on the neutral side of the circuit.

 As a homeowner, how do I check for reverse polarity?

An easy way to check the outlets in your home for reverse polarity is to purchase an outlet tester. These handy little devices are relatively inexpensive, easy-to-use, and can be purchased online or at a local big-box home improvement store. The indicator lights on the tester will show if an outlet is wired correctly, has an open ground, an open neutral, an open hot, or is hot/ground reversed or hot/neutral reversed (reverse polarity). If the tester indicates there is a problem, you should call an electrician to recheck the outlet and make repairs as needed.

 Summary

Although an incorrectly wired electrical outlet may seem like a small thing, it can be a hidden danger that can cause electrical shock, serious injury, or worse. When performing a home inspection, our home inspectors check every outlet they can safely reach and document any of the above-mentioned issues.

 At HomePro Inspections, our home inspectors are trained and always look for electrical outlet and switching issues when inspecting a home. All issues are documented in your home inspection report and recommended for resolution by a qualified professional.

 Visit our website to learn more or to schedule your home inspection in the Rochester, Owatonna, and Faribault, MN areas. You can contact us today at (507) 202-8942 or utilize our online “Schedule Now” feature to set up an appointment.

Oh No, I Have a Water Leak!

Water damage to your home can be overwhelming. Whether the water leak is a burst pipe that quickly floods your basement or a faucet or toilet that has been leaking for a while and you just discovered it. This is stressful, and it’s hard to know what to do first. Most of the time, you start by shutting off the main water supply. Sometimes you grab a bucket to contain the water leak and shut off the water source to whatever is leaking.

 After the initial shock and resulting stress, you immediately go into damage control. It’s hard to know what to do first or where to start. Well, for me, having years of experience in process engineering and project management before becoming a home inspector, I jump right into risk management. It’s a curse!

 Let’s Start by Assessing What Type of Water Leak You Have

 Low Damage – Low Cost

These types of leaks usually don’t cause damage, but instead are inconvenient, and they can cost you time, money, and energy to locate the source. There is a water leak somewhere, and you are wasting water. These costs can add up to a lot of money on your water and sewer bill. Maybe it’s a toilet that is rarely used, the sprinkler system, or perhaps the water softener. It may be hard to pinpoint, but you can hear water running in the pipes somewhere in your home.

Water Meter

  Where to Start

Check and shut off all hose bibs, interior faucets, showers, and sprinkler systems. 

Turn off anything and everything that has a faucet or valve and uses water. Once you have done that, if you still hear water running, you have to systematically search for the source of the water leak. This can take some time and vary in level of complexity, depending on your home.

Locate and check your water meter.

Once the previous water sources are shut down, locate and check your water meter. Water meters vary, so you may see something like an odometer. Some water meters have small dials, or icons, that will indicate low flow. Learn more about how to read a water meter here. If the indicator indicates flow, you still have a water leak somewhere in your home.

Shut down your toilets.

Water leaks from your toilets are typically the most common source of non-damaging water leaks. Turn off the water source to your toilets one by one and check the low flow indicator on your water meter. If the indicator has stopped after shutting off a particular toilet, you’ve found the culprit. If the indicator still shows a low flow, you still have a water leak.

Shut down all other water-using appliances.

One by one, shut down any other appliance or device that uses water in your home. Continue as you did with the toilets until you find your water leak. If the water leak is still undetectable, maybe it’s time to call your favorite plumber.

Moderate Damage – Moderate Cost

Moderate damage water leaks are the ones that don’t seem like a big deal, but if they go unnoticed or are ignored, they can result in significant damage over time. It could be a small water leak next to a shower stall, the drip from the dish washer or sink, or that wet spot on the basement ceiling. These may not look like a big deal on the surface, but they could be developing into a much bigger issue within your walls or ceilings.

Water leak at basement ceiling and wall

 If you notice a new water leak, deal with it right away. Repeated and continuous water leaks, even if they appear to be small, typically don’t go away on their own. Ignoring them can be a big mistake.

 Where to Start

Turn off the water source.

Determine if the main water valve needs to be shut off, or if you can stop the leak with another valve closer to the source.

 Clean up the mess immediately.

If you catch a water leak soon enough, the mess may be minimal, but you should clean it up immediately. Failure to dry up a water leak can result in mold or mildew. Disinfect the area if possible and get a fan and/or dehumidifier going as soon as you can.

 If any organic growth has started, be conscientious and take precautions to minimize spreading mold spores throughout your home. Protect yourself by wearing the appropriate protective clothing if you are to handle anything that may be dangerous. As my dad used to say, it’s better to be safe than sorry!

 Resolve the leak at its source.

Determine exactly where the water leak is originating. Replace or fix whatever is leaking and make sure that any damaged or corroded components are replaced. Take the time to analyze other components that may be suspect or waiting to be your next water leak.

Split water li ne

Significant Damage – Significant Cost

Most homeowners may never have a water leak that falls into this category. These types of water leaks can be catastrophic and result in a great deal of damage to your home. As an area of your home may be flooded, these types of water leaks are pretty obvious. Frozen or burst water lines have the potential to pump a lot of water into your home in a short amount of time. Immediate attention is necessary for this type of water leak once it is discovered.

Basement water leak

 Where to Start

Turn off the main water valve.

Everyone old enough to understand should know where the main water valve is located in your home. Shut it off immediately. If the water leak is before the main water valve, you will want to call a plumber or your city water utility company. You may also want to turn off any electrical circuits in the affected area to prevent electrocution.

Document the damage.

Before you do anything else, document everything by taking photos and videos of the damage. Again, turn off any electrical circuits that may pose an electrocution hazard. Thorough documentation will go a long way towards minimizing your loss when working with your insurance company.

Contact your insurance company.

As soon as reasonable, you should contact your insurance company to report the damage to your home. They need to be aware of the water issue and may be able to guide you to the appropriate actions and sources for remediation.

 Get started on the cleanup, but take care not to do anything significant before the insurance company has a chance to assess the damage. Ask them for direction and make sure to wear rubber boots, gloves, and any other protective clothing and gear you need to minimize any chances of injury.

Summary

Take immediate action if you notice something is leaking in your home. Knowing the extent of a water leak and quickly mitigating the damage is an important first step.

 At HomePro Inspections, our home inspectors are trained and always look for past or active water leak issues when inspecting a home. Any issues are documented and recommended for resolution by a qualified professional.

 Visit our website to learn more or to schedule your home inspection in the Rochester, Owatonna, and Faribault, MN areas. You can contact us today at (507) 202-8942 or utilize our online “Schedule Now” feature to set up an appointment.

Locating The Main Water Valve in Your Home

Experiencing a major water leak is probably a homeowner’s worst nightmare. Knowing where your home’s main water valve is located and how to shut it off is crucial for everyone living in your home.

 Where do I start the search?

The most common place for the main water valve is in the basement utility room. For homes built on a crawlspace, you will most likely find the main water valve near the access. In a home that is built on a slab, the main water valve is usually in the utility room or utility closet.

 For relatively newer homes built in the city, the utilities typically enter the home on the street side. Sometimes, in older neighborhoods, the utilities come from the alley side of the home. In rural homes with wells, the main water valve is typically located in the utility room at the pressure tank.

 In newer homes, the valve may be labeled by the builder, but that is not always the case. In older homes, it can be a treasure hunt when looking for your main water valve. If the main water valve is not in the utility room, we may find it hidden in a cabinet, under the bathroom sink, or behind a secret panel. When our home inspectors perform a home inspection for you, we locate the main water valve and tag it with a label.

 What does the main water valve look like?

Typically, the main water valve is a ball valve or a gate valve.

 Ball valves have a ¼ turn handle, usually dipped in a colored plastic that gives them a good grip material. This type of valve is what is standard in modern home construction. This type of main water valve is operated by turning the valve a quarter turn to the right to shut off the water supply. If the handle is in line with the piping, the valve is open. When closed, the handle will be perpendicular to the piping.

  Ball Valve

 Gate valves are an older style of main water valve. They look kind of like a hose bib spigot. This type of water valve turns to the right to close and to the left to open. Gate valves control the flow by pushing a rod, or “gate,” into the water flow opening. Over time, the seals on gate valves can dry out and deteriorate, and our home inspectors find a lot of these older main water valves are leaking and corroded. We recommend replacement in our home inspection report. If you do have a water leak, you want your main water valve to work, right?

Gate Valve

 Some more clues.

If you live in the city, you may find what is sometimes called a “curb stop.” It will look like a small metal cap about 3 to 4 inches in diameter, either in the driveway or near the curb in the grass. A curb stop will indicate which side of your home the water line is coming from.

  Curb Stop

  Again, if you live in the city, you will have a water meter that the city uses to determine and charge you for your water usage. The water meter will be near the entry point of the water line coming into your home.

  Water Meter

In rural homes, if you have a well, the water main typically enters the home from the side that the well is on. Once in the home, you will find a pressure tank, which is typically blue in color. The main water valve will be the one between where the water line comes into the home and the tank.

  Pressure tank with main water valve

 In Summary

It may not seem like a big deal, but knowing where your main water valve is located will save you time and potential water damage in the event of a major leak or a frozen water line in the winter. While we have described the most common types of main water valves found in homes, there may be other styles. Some of these main water valves may require a wrench to turn them on or off. If this is the case, make sure you have a wrench readily available in case you need it.

 When HomePro Inspections performs a home inspection for you, your home inspector will share the location of the main water valve with you and put an identification tag on the valve so you can easily find it.

 
Visit our website to learn more or to schedule your home inspection in the Rochester, Owatonna, and Faribault, MN areas. You can contact us today at (507) 202-8942 or use our online “Schedule Now” feature to set up an appointment.

Manufactured Stone Veneer, “The Inside Story” ... (See what I did there?)

Over the last several years, builders have been using manufactured stone veneer, which has become quite popular as a modern and attractive siding material on homes. This product was developed to replace natural stone and is manufactured from molded concrete to look like the real thing. This siding product is designed to be installed over wood framing.

Siding and brick

Kick out flashing at top cap, mortar at adjacent siding

Decorative Siding

 This decorative siding product became popular in the late 1990s as a replacement for natural stone veneer. Natural stone was inconsistent and therefore difficult and expensive to install. As it is with most new products, the procedures and installations have changed over the years. Fundamentally, the basic process is the same when installing natural stone or stone veneer. Stone veneer is typically adhered to the side of the home using an attachment system of metal anchors and mortar.

 Brick Veneer

Similar to a brick veneer, the home’s structure behind the stone veneer is typically a wood-framed wall with sheathing. Improper installation of the stone veneer will allow moisture to intrude behind the material where it can negatively impact the framing materials and structure of your home.

 How do these problems start?

Typically, manufactured stone veneer is installed over the wood sheathing, or house wrap, on the exterior of the home. Over time, due to the cement and mortar used and because stone veneer is permeable, water can intrude through cracks and openings or seep through the material. If water gets behind the material and has nowhere to go, that’s where the problems begin. This is a similar situation that can result in water damage with EIFS stucco.

 Water Damage

When water finds its way to the substrate or sheathing of the wall behind the manufactured stone, it begins to cause moisture damage, delamination of the sheathing, and mold and/or other organic growth in the wood. Once water is behind the stone veneer, if it doesn’t have a way to exit, that's where your problems begin.

 Why are we still installing this product?

Since the 1990s, manufacturers and builders have learned how to better install these products, thus improving installation methods and practices. The best solution for water getting in behind this stone veneer is to ensure it has a path out at the bottom. Significant improvements have been made with the experience manufacturers and builders gained from stucco and EIFS water issues. By improving drainage requirements and installation methods, newer installations have far fewer problems with this product.

 Kickout Flashing

When performing a home inspection, our home inspectors are looking for kickout flashings on the top edge of the stone cap, drainage planes, and a weep screed at the bottom of the stone veneer. We also check to make sure that there are no cracks, gaps, or missing mortar. At the vertical edges where the stone veneer meets other siding materials, we make sure there are no gaps or openings.

Steps and siding

Weep screed and gap at adjacent siding

 What if I have an earlier installation?

Since the beginning of time, builders have tried new products and learned from their mistakes. It could be asbestos, shingles, EIFS stucco, aluminum wiring, electrical panels, and the list goes on and on. This means that there could be hundreds of thousands of homes that have the potential for moisture problems if the stone veneer was not installed properly or maintained correctly. Either through failure or issues brought forward as a result of a home inspection, over time, these older installations are eventually replaced.

 In Summary

If you have stone veneer on the front of your home, keep an eye out for signs of water intrusion. Look for loose stones, cracks, and openings or gaps between the stone veneer and the adjacent siding. Efflorescence, which is a white chalky powder, could also be a sign that there is water behind the stone veneer. If you hire HomePro Inspections for your home inspection, we’ll make sure to inspect for these issues and report any findings on your home inspection report.

Brick work

Efflorescence on stone veneer

Visit our website to learn more or to schedule your home inspection in the Rochester, Owatonna, and Faribault, MN areas. You can contact us today at (507) 202-8942 or use our online “Schedule Now” feature to set up an appointment.


Should You Caulk Around the Toilet Base?

We get asked this question a lot by our clients at their home inspection. Caulking around the base of the toilet is recommended but highly debated. We will try to cover the reasons for or against this question and let you decide for yourself.

 First, let’s discuss some reasons for and against caulking around your toilet.

 What the state code says: The 2015 Minnesota State Plumbing Code says, under section 402.2, "Where a fixture comes in contact with the wall or floor, the joint between the fixture and the wall or floor shall be made watertight."

 It looks better:

If you have a tile floor, there may be uneven gaps between the flooring and the toilet base. It may give you a more finished look to have the gap filled with caulking.

 Stabilization:

There may be times when a toilet rocks a little bit because tile flooring may be uneven. You can only tighten the mounting bolts so much before you break the base. Caulking the gap between the toilet base and the floor will help stabilize any rocking.

 That funky smell:

There is the potential for the water used to clean the bathroom floor, or, perhaps, poorly aimed streams, to collect under the toilet base. Because these fluids can never be completely cleaned away, they create the perfect organic soup for all kinds of nasty organisms to grow, flourish, and produce unpleasant odors.

 Now, let's look at some of the reasons why you shouldn't caulk around your toilet base.

Where does the leaking water go?

There’s a lot of discussion with respect to potential leaks under a toilet. Water, in responding to gravity, will generally travel downward and should present as a wet/damp area on the ceiling below. However, if the flooring goes right up to, or in the case of tile, under the mounting flange, any leaks may just simply run out onto the floor. This could also be the case if a basement toilet is installed directly on the concrete floor.

Toilet.

  If the accumulation of fluids is consistent over time, the flooring and structure under the toilet are prone to rot and decay. The photo below shows floor rot adjacent to the toilet mounted in the bathroom above.

Floor with rot

 Deterioration is a common find in older homes. We use a moisture meter in the course of a home inspection to check for moisture below toilets if it is accessible.

 Just what should you do?

Considering the pros and cons, I think there is a happy medium that will satisfy all concerns. In my opinion, the toilet base should be caulked. I recommend you leave a small gap at the front and back. This small gap can allow water to escape if the toilet is leaking. If the water spreads out faster than it goes down, the leak can be detected sooner. It secures the toilet base to the floor, and it will help to prevent any water used during cleaning or those “near misses” from accumulating under the base.

 Visit our website to learn more or to schedule your home inspection in the Rochester, Owatonna, and Faribault, MN areas. You can contact us today at (507) 202-8942 or use our online “Schedule Now” feature to set up an appointment.

Radon Gas - What Is It and What Can You Do About It?

What is radon gas?

To keep it as simple as possible, radon (aka radon gas) is a naturally occurring radioactive noble gas produced by the slow decay of radium in the soils under and around your home. Radon gas is colorless, tasteless, and has no smell, and the only way to know if you have radon gas in your home is to test for it.

Radon

 Radon gas is considered a carcinogen by the World Health Organization (WHO). The United States EPA considers exposure to radon gas a health risk and has classified it as the number-one cause of lung cancer in nonsmokers. Smokers who are exposed to radon gas have a much greater risk of developing lung cancer. You can refer to the EPA’s “A Citizens Guide to Radon” for more information.

 Where does radon gas come from?

Uranium, an unstable radioactive element, is found in soils across most of North America. As uranium slowly decays, it eventually becomes radium, which in turn, as it decays, transforms into radon. As a gas, radon naturally wants to rise to the surface and does so by following gaps and cracks in the soil.

 EPA

The EPA has developed a map representing the general radon zones across the United States and how radon gas levels can fluctuate across our country. If you really want to dig into the uranium decay chain and how it eventually becomes radon gas, follow this excellent link.

 How does radon gas get into my home?

Because the soils under and around the homes in this area can contain traces of uranium and radium, it’s unavoidable that radon gas will also be present, entering homes through gaps and cracks in basement foundations and floor slabs. The higher the concentration and/or the types of soils under your home, the greater the risk that there will be higher levels of radon gas within the home.

 Older Homes

Older homes were draftier, and their basements were less apt to be used as living spaces in the earlier years of the last century. Newer, modern homes are built to be more energy efficient and resistant to air leakage, which can allow harmful levels of radon gas to accumulate.

 The photo below is from the EPA‘s “A Citizens Guide to Radon”.

Radon house graphic

 How do I know what the radon gas levels are in my home?

By testing. Testing for radon gas is easy and relatively inexpensive as a first step in determining if you have elevated radon gas levels in your home. Testing consists of placing a radon measurement device in your home for a minimum of 48 hours. This testing is to be done in what is called “closed conditions,” meaning all windows and doors are closed 12 hours before and during the testing period. Normal in and out is permitted, but for the most part, let’s just keep the doors and windows closed during the testing and pretend it’s winter.

 What if the radon gas levels are high in my home?

The EPA recommends installing a radon mitigation system in homes with radon levels of 4.0 pCi/L (picocuries per liter) or more. Radon mitigation systems vary depending on your home, foundation type, and the level of radon gas measurement. A radon mitigation company can design a system that will reduce the radon gas levels in your home, typically below 1.0 pCi/L. Just for reference, ambient radon gas levels are considered to be around 0.4 pCi/l.

 In Summary

More than 50% of the homes in Olmsted and the surrounding counties have unsafe elevated levels of radon gas. Testing for radon gas is easy and is the first step in protecting your family. Once you know the radon gas levels in your home, you can decide on the next steps in mitigating the radon gas if the levels are high.

 Visit our website to learn more or to schedule your radon testing in the Rochester, Owatonna, and Faribault, MN areas. You can contact us today at (507) 202-8942 or use our online “Schedule Now” feature to set up an appointment.


Mold Testing and Guidance

Mold is everywhere, and the key is understanding what the potential levels of mold are in your home and what to do if they are affecting you and/or your family.

 Mold in Your Home

Mold may be present in your home at any time of year. Mold levels can be elevated during a cool, rainy season or during the hot, humid days of summer. We hope that the following guidance gives you a better understanding of the dangers of mold and some of the signs that you may want to pay attention to that indicate mold testing and/or mitigation may be required.

 What is mold?

Mold is an organism that is everywhere. Mold’s job is to break down and decompose dead and dying materials in nature, and it’s found both indoors and outdoors. It’s never completely gone, and its existence is necessary in the grand scheme of things we call nature. 

 Places for Mold

Places like wet basements, crawlspaces, and poorly ventilated attics are susceptible to mold, or “microbial growth.” Areas where there are persistent leaks can also provide the right conditions for mold. These areas may have that familiar damp and musty “basement smell.” You may want to consider mold testing if you have or think you have that damp, musty smell in your home.

 When and why would you want mold testing performed in your home?

If you see what you think is mold in your home, you may want to resolve the source and remediate the problem to prevent unnecessary and harmful exposure to your family. Mold testing afterwards will determine if you have effectively eliminated the issue.

 Effect of Mold on People

Problems may arise with mold when humans are exposed to higher levels of the microbial spores. Mold doesn’t affect everyone the same. People with allergies, compromised immune systems, infants, and the elderly are the most affected by mold exposure. 

 Mold Testing

We do a lot of mold testing for people who are buying new homes and have asthma or other health issues that are affected by high levels of mold in the air. They want to make sure there are no issues before buying and moving into the home.

 Reason for Testing for Mold

Another frequent reason for mold testing is when people move into a new home or have visitors who develop health issues they haven’t experienced outside of that home. We recently did mold testing for a couple that had a young grandchild who was fine everywhere in their home except in the basement. When the child went into the basement, they developed red, scratchy eyes and sneezing.

 Here’s a brief explanation of our mold testing.

Any type of mold growing in your home can cause a health problem, and the effects of mold exposure can differ significantly from one person to another. If you think you have a mold problem in your home, you should consider having mold testing done. Sometimes the problem is obvious, but other times, mold testing or sampling is the only way to determine if there is an actual mold issue.

 After scheduling an appointment, one of our mold technicians will come to your home to perform mold sampling. After discussing any concerns you may have, our technician will inspect the home for any areas that may be a potential problem. 

 Types of Mold Testing

When we conduct our mold testing, there are two types of mold sampling that we may do. The most common is an air sample, which will detect any mold spores that are present in the air of the area being sampled. The other is a swab sample, which will examine any mold microbes that are swabbed from a surface.

 Testing Does Not Determine Mold’s Affect

It must be noted that mold testing alone cannot determine how you or your family will react to or be affected by mold growth in your home. Identifying and removing the source and root cause of the mold spores is the best first step in protecting your family.

 How long does mold testing take, and is it accurate?

Our mold testing procedures and process typically take about 30 minutes or so on average. Most of the time, in addition to the sampling, the visual inspection is fairly routine in nature. Sometimes it takes longer if there are obvious issues and additional sampling needs to be documented. 

 Analysis

After the mold testing is completed and documented, the samples are sent off to a lab for analysis and reporting. The reports detail any molds found in the samples, common areas for their development, and the common symptoms of exposure to the molds identified.

 Microbial Testing

Microbial testing innovations in recent years have greatly improved mold testing results to about 99% accuracy. As long as protocols are followed and there is no user error, the testing laboratory can accurately determine if there’s a mold problem and the types of mold present.

 In Summary

If you think you have a mold problem, you should have mold testing performed in your home. Whether or not it’s an obvious problem or just something in the air, testing should help you to determine if you have an issue. Mold testing is relatively inexpensive and is the first step in determining your course of action.

 Visit our website to learn more or to schedule your mold testing in the Rochester, Owatonna, and Faribault, MN areas. You can contact us today at (507) 202-8942 or use our online “Schedule Now” feature to set up an appointment.

How Do I Know If I Have Mold in My Home?

As homeowners and homebuyers become more educated about home ownership, a common concern they share is whether or not there’s microbial growth, or, as most people refer to it, mold, in their homes. If you have concerns about mold in your home or mold testing, you shouldn’t ignore them.

 Why Should I Get Mold Testing?

As home inspectors, we see a wide variety of mold in our home inspections. Some issues are obvious, such as wet basement walls, under kitchen or bathroom cabinets, or where we see leaking. Other times, it’s a damp or moldy basement smell that alerts the home inspector or homeowner that there may be an issue. There are other times where we’re told by a client that they have someone in the family that gets stuffed up and/or has allergic reactions only when they’re in the basement.

 Wet Areas and Visual Growth

You may want to consider mold testing if you have had flooding or discover an area that has water damage or leaks. Areas that are consistently wet are prone to mold growth in a fairly short time depending on the conditions. You can reduce your risk and prevent potential issues by drying out wet areas within 48 hours. Vacuum up standing water, pull back carpets, and run fans and dehumidifiers if necessary to get the area dried out as quickly as possible.

 Drainage

Managing the source of water intrusion is key. If you have poor roof water runoff management or drainage issues, these should be corrected. I’ve seen too many times where a homeowner has fans and dehumidifiers running in a wet area of a basement where the root cause starts outside and is not addressed.          

Mold in corner
mold along wall

Inadequate Ventilation

There are times when your home inspector points out inadequate ventilation in a basement. This could be due to a lack of air returns in each room of the basement. Another common find is that all or most of the supply vents are closed “because it gets too cold in the basement when the air conditioning is running.”

 Air Exchange

Since cold air is denser than warm air, it wants to seek out the lowest area. Lack of ventilation and air exchange can result in humidity levels exceeding recommended levels. There may be times when performing a home inspection that one of our home inspectors walks into a basement where it’s cold, damp, and musty smelling. These conditions will alert the home inspector to look for potential signs of microbial growth.

 Recommendations

The Environmental Protection Agency (EPA) recommends that the humidity levels in a home be kept in the 30% to 60% range to prevent possible mold growth.

Mold on ceiling

 Health Concerns

The presence of mold in a home may or may not cause issues for all people. I once had a home inspector on my team that didn’t need to do mold testing if he was doing a home inspection on a home that had mold in it. On one occasion when I was training him, we entered a home, and within 5 minutes he had watery, itchy eyes and was sneezing. I asked him if he was okay, and he said there was probably mold in the home. Sure enough, we went to the basement, and there were signs of active mold growth on the basement utility room walls. I, on the other hand, had no reaction to the conditions. 

 How Much Exposure is Too Much?

Exposure to an elevated level of microbial growth or mold spores affects everyone differently. People with compromised immune systems, the elderly, the very young, and those with allergies can be prone to issues when exposed to mold. Symptoms can include watery eyes, runny nose, itching, difficulty breathing, wheezing, coughing, headaches, and fatigue. Continued and repeated exposures to poor indoor air quality can develop into more severe reactions over time. Molds such as Aspergillus and Stachybotrys may produce mycotoxins which can be toxic to some people under certain conditions, resulting in serious illnesses.

 Summary

People with potential health issues related to mold exposure should have mold testing conducted as part of their home inspection when buying a new home. If you see the warning signs, have flooding or water intrusion, or detect a damp, musty smell in your basement, there may be microbial growth. You’ll want to test for mold to make sure there are no issues.

 Visit our website to learn more or to schedule your mold testing in the Rochester, Owatonna, and Faribault, MN areas. You can contact us today at (507) 202-8942 or use our online “Schedule Now” feature to set up an appointment.


Why are Gutters and Downspouts So Important? Your Rochester, Owatonna, and Faribault Area Home Inspector Explains Why.

One of the most important yet commonly neglected fixtures on your roof are the gutters and downspouts. Some may question the importance of gutters and downspouts, as well as their maintenance, but there’s a reason you should have them on your home. These essential items play an important role in managing rain runoff from your roof and keeping your basement dry. As part of a home inspection, our home inspectors evaluate the condition and function of the gutters and discharge chutes.

 That’s a lot of water!

Did you know that on 1,000 square feet of surface area, one inch of rainfall creates 623 gallons of water? Let’s imagine you have a 32-foot x 34-foot home with a 2-foot eave all around. That’s 1,368 square feet of surface area (not taking roof pitch into consideration for simplicity). Drop 2 inches of rainfall on this roof... that’s about 1,700 gallons of water running off the edge! All that water has to go someplace, but where?

 Get that water away from my foundation!

Gutters, downspouts, and discharge chutes manage the water from your roof by routing it away from your foundation. If the water is allowed to run off the roof and saturate the soil next to your foundation, it can lead to a wet basement. An even worse situation is not having gutters, downspouts, and discharge chutes, and not having adequate soil slope away from the foundation. 

 The photo shows wetness in a basement where the discharge chute had been removed and was lying in the shrubs. The downspout was dumping water right at the foundation’s corner.

foundation damage

 A case in point.

At a recent home inspection, one of our home inspectors noted that the gutters at the rear of the home had some damage and were prone to leakage. In addition, the discharge chute was not extended far enough away from the foundation, and the soil sloped back towards the foundation. On top of that, the runoff from the driveway was routed around to the rear of the foundation. The home inspector documented all of this as in need of correction in the inspection report.

 Water Mitigation Systems

In the basement, it was noted that there were a couple of areas at the rear of the basement where the carpet and sheetrock were wet. The home inspector also documented this as in need of repair and noted they may need to have a basement waterproofing company install a water mitigation system.

 Our recommendation was that they first correct the issues with the gutters and soil slope, and then make sure that any water coming from the roof was flowing away from the home.

 Maintain your home’s gutter system.

Keep your gutters clean and discharge chutes in place. If you fail to maintain your system, you’re asking for trouble. Gutters that let water run over the edge are just as bad as having no gutters at all. Gutters plugged with water and debris are heavy, and that extra weight can pull gutters loose and even cause them to completely separate and fall from the house.

full gutter

 Keeping your gutters and downspouts clean can be achieved by physically removing any debris or paying someone to clean them for you. For me, the height and pitch of the roof plays a big part in whether I would tackle the project myself. You can also have a system installed that prevents the accumulation of leaves, twigs, and other debris in your gutter system. There are plenty of DIY and professional installations available.

 Conclusion

Having proper gutters, downspouts, and discharge chutes is your number-one defense against a wet basement. Keep them clean and properly maintained and they’ll do their job every time it rains. Remember, a one-inch rainfall equals 623 gallons per 1,000 square feet...

Visit our website to learn more or to schedule your home inspection in the Rochester, Owatonna, and Faribault, MN areas. You can contact us today at (507) 202-8942 or use our online “Schedule Now” feature to set up an appointment.

What’s the Difference Between a P-trap, an S-trap, and Why Does Venting Matter?

There are basically two types of drain traps found under a sink in your home; a P-trap or an S-trap. As you can see from the pictures below, they get their names from their shape.

P trap

P Trap

s trap

S Trap

We commonly find drain trap issues when conducting a home inspection in older homes or in basement DIY projects for bathrooms, laundry tubs, and wet bar sinks. We call these out as in need of correction because some traps, S-traps in particular, haven’t been allowed by the Minnesota Plumbing Codes for the last several decades.

 Why Are Drain Traps Important?

The purpose of a drain trap is to seal off the drain system with a water seal. Not having a water seal can allow sewer gases to back up into the room. Some of these gases are smelly, and others are odorless. There’s the potential for methane, carbon monoxide, hydrogen sulfide, and ammonia to escape if the water trap is open. Now, this seems like stuff from a sci-fi movie, but vermin can also enter your home through sewer drains if you do not have a properly working sink trap with the proper water seal.

 S-traps and P-traps

S-traps were used in the early 20th century as homes were either built with indoor plumbing or had it added. It was a good idea at the time versus no trap at all. The problem with S-traps is that, for example, if you drain a sink full of water, the suction or siphon created by the water going up and over the top loop can pull, or siphon, all of the water out of the bottom loop, leaving no water seal. 

 P-traps are designed to eliminate the siphoning of the water seal. With a minimum horizontal extension and intersecting to a vertical drain, a P-trap will break the potential siphon, leaving the water seal intact.

  Both the S-trap and P-trap designs can lose their water seal in sinks that have not been used for an extended period. The water in the trap can evaporate and leave you without a water seal. Just add a little water and you should be good to go.

 Venting

In addition to the introduction of the P-trap, home plumbing systems also require drain waste venting (DWV) to the exterior. A vent “stack” or vent pipe is used in the plumbing system to eliminate any negative pressure in the drain system. The vent pipe will typically run vertically within the wall system of the home, through the attic and roof to the outside. On larger homes, there can be more than one vent stack.

 A device known as an Air Admittance Valve (AAV) is an alternative to a vent stack and is sometimes added to older plumbing systems under sinks or areas where it’s not possible to tie into the home’s vent system. An AAV works by allowing air to enter the plumbing through a one-way valve. This will help to equalize the internal pressure of the drain system without letting sewer gases escape.

 AAVs must be installed so their inlet is higher than the drain at the bottom of the sink to prevent overflow or back-up.

 It must also be noted that, even though AAVs are available at your local plumbing supply or big box store, they may not be allowed by your local code.

 Summary

If you have any S-traps in your older home and have issues with foul smells, you may want to look into converting your sink drains over to a P-trap and possibly venting, either by adding a vent stack or an AAV. Of course, there have been times when a homeowner will tell one of our home inspectors that they’ve lived in the home for several years and there has never been a problem. While they’re probably telling the truth, the problem still needs to be addressed; codes are changed for a reason.

 Visit our website to learn more or to schedule your home inspection in the Rochester, Owatonna, and Faribault, MN areas. You can contact us today at (507) 202-8942 or use our online “Schedule Now” feature to set up an appointment.


Don’t Vent Your Bathroom Fan to The Attic Space

Building codes across the country require bathroom venting. Sure, a bathroom fan helps if your notoriously fragrant Uncle Larry has just been in there, resulting in some major aromatic issues at the holidays, but the primary purpose of a bathroom fan is to remove moisture from the room.

moisture

Back in the day

Older homes were typically constructed with just one window in the bathroom. That was usually fine because those houses were generally not built as tight and normally contained only a bathtub, sink, and toilet. Over time, people renovated and added a shower to the bathroom. As the shower brought convenience, “bath day” turned into a daily shower ritual as the family grew. Showers create a lot of humidity, and if everyone in the family took a shower every day, the bathroom would become overly damp and steamy. The solution was to install a bathroom fan to exhaust the excessive moisture, and a lot of times, that bathroom fan was vented directly into the attic by the DIY homeowner.

vent in the attic

Why it’s bad to vent to the attic

For years, homeowners and contractors alike vented the bathroom fan directly into the attic space. Over time, the high levels of humidity vented to the attic started to cause problems. The excessive moisture wasn’t finding its way up and out through the roof venting. Instead, it was condensing on the roofing structure and sheathing. That moisture, over time, resulted in the perfect environment for mold and mildew, and in some cases, dry rot of the roofing structure and sheathing. In the 1990’s, codes changed, and the bathroom fan was required to vent to the exterior of the home. Bathroom venting requirements have continued to change over time.

 The photo below shows an exhaust vent that has disconnected from the roof vent and is venting into the attic space near the soffit. Note the staining and deterioration on the sheathing, as well as the rust on the nails.

insulation

During the course of a home inspection, if the attic space is accessible, our home inspectors check to see that any bathroom fans or kitchen exhaust are not venting into the attic space. If we find any issues, they are documented as in need of correction in our inspection report.

 Attic design and purpose

Attics are designed to allow excess heat to escape from the attic. Typically, there are vents at the soffits for air to enter as well as vents near the peak for exhausting air. These can be roof vents, ridge vents, turbines, or thermostatically controlled power vents. So, if everything is working like it is supposed to, air will enter from the lower soffit area and move up and out of the vents at the peak. 

 Insulation Added in Attic Space

Occasionally, homeowners will add insulation to the attic space to increase energy efficiency. It is common in older homes that our home inspectors find that the soffit vents have been covered with insulation. This restricts the flow of air through the attic. We often see signs of poor ventilation as staining or deterioration on the roof sheathing, as well as rusted nails. Air can still move through the attic space, but not enough to remove excess moisture.

 Conclusion

Venting your bathroom fan to the attic space is not a good idea, but it is okay to vent through the attic by using the proper venting materials from your bathroom fan to a proper roof vent. In the end, if done properly, you can reduce the moisture problems in the bathroom and not cause unintended issues, like mold or mildew, in the attic space.

 Visit our website to learn more or to schedule your home inspection in the Rochester, Owatonna, and Faribault, MN areas. You can contact us today at (507) 202-8942 or use our online “Schedule Now” feature to set up an appointment.


Concrete, Cracking, And Expansive Soils

There are two kinds of concrete: the kind that has cracked, and the kind that is going to crack...

cracked concrete

  How do expansive soils cause problems for concrete slabs?

The freezing temperatures in Minnesota can result in some pretty dramatic heaving, movement, and cracking if the soils beneath a concrete slab aren’t chosen and prepared correctly and don’t have proper drainage. When we perform a home inspection, our inspectors at HomePro Inspections are looking for and documenting any potential issues with concrete slabs.

 What are expansive soils?

Expansive soils are a type of soil that is known for its ability to swell and shrink in response to changes in moisture levels and temperatures. In this part of the country, blue and green clays are problematic. This can cause serious problems for structures built on these soils, as they can crack foundations and damage sidewalks and roads. In order to mitigate the risks posed by expansive soils, engineers typically use special foundations and construction techniques. However, even with these precautions, damage from expansive soils can still be a problem.

 How do expansive soils affect concrete slabs?

When concrete cracks, it's usually because of expansive soil rising and settling. Also known as "swelling clay," expansive soils can wreak havoc on everything from sidewalks and patios to foundations.

 Expansive soils contain minerals that absorb water and expand when wet. This can put tremendous pressure on concrete, causing it to crack and crumble, rise, or settle. In some cases, the damage can be so severe that the entire slab needs to be replaced.

 Correct Base Material

There are several ways to deal with expansive soil, but the most important thing is to make sure that any concrete slab you pour has the correct base materials, appropriate drainage, and is properly reinforced. This will help reduce the risk of cracking and also provide some protection if the cracks do occur. Be sure to consult with a qualified contractor before beginning any concrete project in an area with expansive soils.

 How do freezing temperatures affect expansive soils?

The problem lies in the fact that concrete is porous, meaning that it can absorb water from the ground below. When this water freezes, it expands, putting pressure on the slab above. Over time, this can cause cracks to form in the concrete. In severe cases, the entire slab can even collapse. So, if you live in an area with cold winters, it's important to keep an eye on your concrete slabs and take steps to prevent them from being damaged by freezing temperatures.

 Why is it important to repair cracks in concrete?

Concrete slabs are subject to all sorts of stressors: expansion and contraction due to temperature changes, the weight of vehicles, and even just regular foot traffic. Over time, these stresses can cause cracks to form in the concrete.

 Safety Hazards

While some cracks are purely cosmetic, others can pose a serious safety hazard. For example, if a crack is deep enough, it can cause a trip and fall accident. In extreme cases, cracked concrete can even collapse and settle entirely. That's why it's important to repair cracks in concrete as soon as they're discovered. By filling in the cracks, you'll not only improve the appearance of your concrete, but you'll also help to prevent further damage due to freeze-thaw cycles. To help our clients, we try to define concrete cracks as maintenance items or recommended repairs in our home inspection reports. This helps to prioritize how these issues are resolved.

concrete with a crack

 What are the best methods for repairing cracks in concrete?

Concrete is a sturdy material that can last for many years with proper care. However, even the most well-constructed concrete slab is not immune to cracks. While small cracks may not seem like a big deal, they can cause serious damage if left unaddressed. Fortunately, there are a number of effective methods for repairing cracks in concrete.

 Epoxy Resin

One popular method is to fill the crack with a flexible epoxy resin. This type of resin is designed to expand and contract as the temperature changes, which helps to prevent the crack from reappearing. Epoxy resins are available in a variety of colors, so you can also use this method to improve the appearance of your concrete.

 Polymer-based Concrete Leveling Compound

Another option is to fill the crack with a polymer-based concrete leveling compound. This type of compound can be applied using a simple caulk gun, and it will harden in just a few hours. Once it's hardened, the concrete leveling compound will help to level out any uneven surfaces and prevent the crack from spreading.

 Conclusion

Cracks in concrete are not only unsightly, but they can also pose a serious safety hazard. Fortunately, there are a number of effective methods for repairing cracks in concrete. By filling in the cracks, you'll not only improve the appearance of your concrete, but you'll also help to prevent further damage and keep your sidewalks, driveways, and patios safe.

 Visit our website to learn more or to schedule your home inspection in the Rochester, Owatonna, and Faribault, MN areas. You can contact us today at (507) 202-8942 or use our online “Schedule Now” feature to set up an appointment.


The Dangers of Ungrounded Outlets and How GFCIs Can Help

What are ungrounded electrical outlets?

Ungrounded electrical outlets (two-prong receptacles) are usually found in older homes that have the original 2-wire ungrounded system. This system was designed with only the hot (black) and neutral (white) wires. In modern construction, a properly grounded circuit requires the use of a 3-wire system that contains a ground wire in addition to the hot and neutral wires and a three-prong outlet. If the ground wire becomes disconnected, a grounded outlet becomes ungrounded.

 Why can ungrounded electrical outlets be dangerous?

Ungrounded electrical outlets are common in many homes built before the early 1960’s. It’s the way homes were built back then. Unfortunately, they pose a safety hazard. An ungrounded electrical outlet doesn’t have a ground wire. This means there’s no path for the electricity to flow into the ground (earth) if there’s a fault. A fault is when something shorts out, and a short can inflict serious injury or death, cause overheating, and spark a fire.

adapter

In the 70’s, most new electrical appliances, vacuum cleaners, and such started coming with 3-prong plugs. I remember it was frustrating because you always had to find an adapter, commonly known as a “cheater,” so you could plug the new appliance into the 2-prong outlet. The most common, but incorrect “fix” was to replace the old 2-prong outlets with 3-prong outlets. Problem fixed, right? No way! This is dangerous because if you see a 3-prong outlet, you assume it’s properly grounded, and in this case, it’s not. You still don’t have a ground wire.

outlet

What is a GFCI, and how can it help?

The requirement for grounded outlets was introduced in 1962 by the National Electrical Code (NEC, 210-7), and the replacement of ungrounded outlets with grounded outlets was addressed in 1965. In 1984, the NEC amended 210-7 to allow the use of a ground fault circuit interrupter (GFCI) to provide protection for a non-grounded circuit. A GFCI is a device that’s designed to protect people from electrical shocks by monitoring the current flowing through a circuit. If an abnormal imbalance is detected, the GFCI will sense it and trip (open the circuit), instantly de-energizing the circuit. This prevents electrical shocks by interrupting the flow of electricity before it becomes dangerous.

 GFCI Outlet

It’s important to know that on a 2-wire ungrounded system, a GFCI outlet needs to be installed at every outlet to provide proper protection. In this case, every outlet must be labeled “No Equipment Ground.” On a 3-wire system, the GFCI only needs to be installed on the first outlet of the circuit. 

 These explanations are very basic, and there are many considerations regarding electrical codes and the myriad of updates they’ve undergone throughout the years. If you ever have any questions or concerns about the safety of your electrical system, it’s always best to consult with a qualified electrician.

 Conclusion

First and foremost, it's important to understand what an ungrounded electrical outlet is and why they can pose a serious safety hazard. An ungrounded electrical outlet is one that does not have a ground wire connected to it. This means there’s no path for the electricity to flow into the ground if there’s a problem with the outlet or the wiring, which can lead to electrical shocks or cause a fire.

 At HomePro Inspections, we’re trained to identify potential concerns and are always looking for these types of issues when inspecting a home. When found, issues are documented and recommended for resolution by a qualified professional.

 Visit our website to learn more or to schedule your home inspection in the Rochester, Owatonna, and Faribault, MN areas. You can contact us today at (507) 202-8942 or use our online “Schedule Now” feature to set up an appointment.


What Happens When You Don't Change Your Furnace Air Filter?

Furnace Filter

One way to save money on your energy bills and help your furnace run more efficiently is by changing the furnace air filter at least once a month or as recommended by the manufacturer. What can happen if you don’t change it? The air in your home will be dirtier, and so will you. Let’s take a look at how dirty furnace filters impact health, homes, and budgets.

 Reduced Airflow

When a furnace air filter is clogged with dirt and debris, it can seriously obstruct necessary airflow. This prevents the furnace from circulating the volume of air required to keep the house comfortably, efficiently, and economically heated or cooled. 

 Health Issues

A dirty furnace filter can be a breeding ground for bacteria and allergens, which can cause respiratory problems and other health issues.

 Higher Energy Bills

The dirtier and more clogged a furnace air filter becomes, the harder the furnace has to work to circulate the air, and this costs you more in electricity and fuel in the long run. In fact, according to Energy Star, a dirty furnace air filter can increase energy bills by 5% to 15%.

 Premature Furnace Failure

One of the most common problems associated with a dirty furnace air filter is premature furnace failure. When a furnace needs to work harder and longer than necessary, the extra strain can lead to a costly breakdown and the potential need to replace the entire unit.

 Selecting a Furnace Air Filter - Size and Style

When it comes to furnace air filters, there are a variety of different types available on the market. The most important factor to consider when selecting an air filter is the size of your furnace. You want to make sure you get a filter that is the correct size as recommended by the furnace manufacturer.

 Another thing to keep in mind is the type of furnace air filter you select. The most common type of filter is the pleated furnace air filter, which is made of fiberglass or synthetic material. These filters are designed to trap dust and other particulates, making them ideal for people with allergies or respiratory problems.

 If you have pets, you may want to consider a HEPA air filter. There are multiple products available. Do your homework to select the furnace air filter that works best for you. These filters are designed to remove 99.97% of all particles from the air, making them ideal for people with pets or allergies.

 Summary

It's important to replace your furnace air filter on a regular basis, preferably every month, or as recommended by the manufacturer. A clean furnace air filter will help ensure your furnace is running efficiently and also help keep your home healthy. A dirty furnace filter can cause all sorts of problems, from increased energy bills to respiratory problems. So be sure to change your furnace air filter regularly and keep your home happy and healthy.

 As part of a home inspection, our inspectors check to see that the furnace is clean and serviceable and that the air filter is correctly sized. If the furnace fails inspection, we recommend maintenance in our inspection reports.

 Visit our website to learn more or to schedule your home inspection in the Rochester, Owatonna, and Faribault, MN areas. You can contact us today at (507) 202-8942 or use our online “Schedule Now” feature to set up an appointment.

Dryer Vent Fire Hazards

The 2020 National Fire Protection Association (NFPA) statistics show there are between 15,000 and 17,000 fires every year caused by washers and dryers in the United States. Clothes dryer fires injure around 380 people and are responsible for around 50 deaths per year. The leading cause of these fires (34%) is a failure to clean or replace defective dryer vents. As home inspectors, we see a lot of dryer vents that are plugged, damaged, incorrectly installed, or unsafe due to the use of improper materials.

 Personal Story

Several years ago, before I became a home inspector, my wife complained that our dryer was starting to take way too long to dry clothes. Sometimes it took two cycles to dry jeans. She wanted a new dryer. The home was only two years old; how could the dryer be giving us problems already? I did some troubleshooting; the dryer was fine, but the dryer vent was badly clogged with lint.

 In my past homes, the dryer was at an outside wall, and basically less than a foot from the exterior. In this 2-year-old home, the dryer is in the middle of the main floor. While convenient, it creates a problem. The vent pipe goes into the wall, turns downward to the basement, turns horizontal for about 8 feet, turns horizontal again, and extends about 20 feet to where it exhausts to the exterior.

 I disassembled the dryer vent and cleaned it with a dryer vent brush. The result was about one and a half 5-gallon pails full of lint! Needless to say, the dryer started to work perfectly again, and the vent is now cleaned annually.

 Other Contributors

During the course of our home inspections, we come across a variety of issues that can contribute to a potential dryer fire.

 Improper Materials

There are a couple of products on the market for venting dryers that should be used with extreme care. One is a “slinky” type made of shiny mylar materials. These can be a problem because they’re corrugated, which doesn’t allow for the smooth flow of air. The disrupted air flow typically results in accumulated lint and plugging. 

 Another product is the flexible aluminum dryer vent. While easy to use, it doesn’t have a smooth inner surface, and this will lead to accumulated lint and plugging.

Dryer vent

Damaged or crushed

Unfortunately, the materials discussed above can easily become damaged. When performing inspections, we often find these types of vents have become crushed or torn.

 In reality, these materials are meant to be used as a transition piece. This means that if you have a short run where a solid metal dryer vent doesn’t line up, these materials are okay to use. Unfortunately, these products come in packages of several feet, and instead of cutting what’s needed for the transition, people just connect the ends and leave an 8-foot “anaconda” stuffed behind their dryer.

kinked vent
crinkled vent

Summary

Through proper installation, cleaning, and maintenance, you can do your part as a homeowner to prevent a dryer fire in your home. Even if you feel your dryer is running perfectly fine right now, it’s better to be safe than sorry.

 Use only UL-approved materials, use them properly, and follow your local codes when replacing dryer vents.

 Clean the lint trap in your dryer after every load, and occasionally check the dryer vent exhaust on the exterior of your home. Pay attention to dryer cycle times and, most importantly, have your dryer vents cleaned at least annually.

 Visit our website to learn more or to schedule your home inspection in the Rochester, Owatonna, and Faribault, MN areas. You can contact us today at (507) 202-8942 or utilize our online “Schedule Now” feature to set up an appointment.


Understanding Minnesota’s Carbon Monoxide Alarm Requirements in Your Home

The State of Minnesota requires carbon monoxide alarms in your home. There are plenty of misconceptions and misunderstandings regarding CO alarms. Let me explain.

 Carbon Monoxide

Carbon monoxide is an odorless, invisible gas that can be generated by combustible (fuel-fired) appliances in your home. Exposure to carbon monoxide at lower levels can make you feel tired or sick. At higher levels of exposure, carbon monoxide can result in death. 

 Individuals with the highest risk are the elderly, unborn babies, and small children. People with respiratory problems, heart conditions, anemia, and immunity issues are also at a higher risk of death due to exposure to carbon monoxide.

 CO vs. CO2

People often refer to carbon monoxide as CO2. CO2 is carbon dioxide. It’s what we exhale, and it’s used to make your pop fizzy. Remember, carbon monoxide is abbreviated as CO.

 Alarm vs. Detector

A CO alarm is a device typically placed in a home. It has its own power source and sounds an alarm that will alert inhabitants in the event of elevated CO levels. A CO detector is basically the same type of device, but it may or may not include an audible alarm function.

 A CO detector is a common tool utilized by a home inspector to determine if furnaces, water heaters, fireplaces, etc. are potentially leaking CO into the living space.

 Minnesota Carbon Monoxide Codes and Statutes

There’s a lot of code language, so let me try to summarize the basics:

·      The device must be listed with UL 2034

·      A device is required in new homes that utilize fuel-fired appliances

·      Mandatory when there’s an attached garage with an opening to the living space

·      Added to existing homes when listed additions, alterations, or repairs are made

·      Must be on every level, within 10 feet of sleeping areas

·      Located within the sleeping area if a fuel-fired appliance is present

·      Combination smoke/CO alarms are acceptable

·      Unless retrofitting, an alarm must be hardwired

·      For multiple alarms, unless retrofitting, alarms must be interconnected

 Carbon Monoxide Alarms

Again, this is just a summary. Read the full carbon monoxide code requirements and statutes:

 Minnesota carbon monoxide code requirements can be found here:

·       Section R315 of the MN Residential Code.

 Minnesota carbon monoxide statutes can be found here:

·      Sections 299F.50 and 299F.51

 Additional guidance from the EPA regarding carbon monoxide alarms:

·        https://www.epa.gov/indoor-air-quality-iaq/what-about-carbon-monoxide-detectors

·        https://www.epa.gov/indoor-air-quality-iaq/where-should-i-place-carbon-monoxide-detector

 Summary

Tragically, people are still dying every year due to the lack of or non-existence of carbon monoxide alarms. These devices are easy to acquire, easy to install, and are required to help keep us alive. For the safety of your family, make sure you have them properly installed and replaced if they are old or not functioning. Check your carbon monoxide units to make sure they are not past their service life. They usually need to be replaced every 7 to 10 years, depending on the manufacturer.

 Also, be aware of the warning signs of carbon monoxide poisoning, such as headaches, dizziness, feeling sick, and/or lack of energy. Low levels of carbon monoxide in small areas may produce these symptoms in some people before the alarm alerts you of a bigger problem.

 Visit our website to learn more or to schedule your home inspection in the Rochester, Owatonna, and Faribault, MN areas. You can contact us today at (507) 202-8942 or utilize our online “Schedule Now” feature to set up an appointment.


No Power in Your Bathroom?

The power is out... in all your bathrooms... at the same time. What’s going on? The fan still works, and the vanity lights work, but there’s no power at the outlets.

 This can happen on occasion and can certainly be a concern, especially if everyone is getting ready for school or work at the same time.

 An understanding of your home’s electrical system, its workings, and how the electrical code requires bathrooms to be wired can help. Luckily, there’s usually a simple explanation and fix for this scenario.

  Basic electrical requirements for bathrooms

 In short, the International Code Council requires protection to prevent electrical shock in bathrooms. Electrical outlets in bathrooms must be on their own 20-amp circuit and protected by a GFCI (Ground Fault Circuit Protector). If you are not familiar with a GFCI, it helps to keep you from getting electrocuted. You can learn more about how GFCIs work here.

 The bathroom circuit only needs to have one GFCI outlet or breaker to protect all of the bathrooms. This simplifies things for the electrician, but can be confusing for a homeowner. See the image below for a better understanding.

Ground fault receptacle

 Checking the GFCI

 Most commonly, the reason for a loss of power in a bathroom is that the GFCI has tripped. It’s good to know which bathroom the GFCI is located in just in case you need to reset it.

 Often times, the electrician will install the GFCI in the master bathroom or the most commonly used bathroom. This isn’t always the case, as sometimes it gets installed where it’s easiest for the electrician.

Outlet

  There may be an orange or red light glowing on the GFCI outlet, which indicates that the circuit has been tripped, and the reset button will have popped out. Simply press the button to reset the GFCI. You have successfully solved the problem and will be regarded as a hero by your family. Great Job!

 Some things to consider

 If you find a GFCI in one of the bathrooms and it isn’t tripped, it doesn’t mean that this isn’t an issue. Check every bathroom because sometimes a previous homeowner may have installed a GFCI at every bathroom outlet. This is unnecessary; only the first outlet on the circuit needs a GFCI.

 When GFCIs were first introduced, there was usually only one GFCI on the circuit that connected the garage, bathroom(s), and exterior outlets. If the GFCI is not in a bathroom, it may be in the garage.

 As with all things, GFCIs are also prone to failure. GFCIs exposed to high moisture, such as hot steamy showers or high outdoor humidity, may not reset after being tripped. A GFCI that doesn’t reset will have to be replaced.

 Check the panel

 If you can’t find a tripped GFCI, the bathroom breaker in the panel may have been tripped. Hopefully, the breakers in your panel have been properly labeled.

 If you find a tripped breaker, it can be reset by flipping the switch to the off position, then back to the on position. If it resets, you should now have power back to the bathroom circuit.

circut breaker

 In newer homes, there’s a chance there are no GFCIs in any of the bathrooms, and the GFCI may be in the breaker itself. In this case, you will see a yellow button next to the switch on the 20-amp bathroom breaker. The yellow button is the test button. If power is lost, it will be tripped and must be reset as previously described. 

 During the course of the home inspection, we test and reset all GFCIs as well as evaluate the electrical panel. Your home inspector will describe the basics of the GFCIs, the types of breakers in your panel, and what they do.

 If all else fails, call a professional electrician

 If you have power to the panel, every outlet has been checked, and you don’t have a tripped breaker, it may be time to call an electrician. Sometimes a problem can be outside of your skill set. Hopefully, you can solve the problem yourself, but if you can’t, a professional electrician can make the proper evaluation and repairs.

 Visit our website to learn more or to schedule your home inspection in the Rochester, Owatonna, and Faribault, MN areas. You can contact us today at (507) 202-8942 or utilize our online “Schedule Now” feature to set up an appointment.

Should a Homebuyer Waive the Home Inspection?

Homebuyers are becoming overwhelmed and exhausted by the homebuying process in this competitive market, and that’s even before they buy a home! Because of low inventory, sellers are receiving multiple offers on their homes when they list them. Good for the seller, but bad for the homebuyer. One of the tactics being used, in addition to making an offer way over asking price, is to waive any home inspection contingencies.

This is most likely the largest purchase you will ever make

 First-time homebuyers can sometimes be grossly unprepared for homeownership and what’s awaiting them after they buy a home. New homebuyers sometimes forget that when something breaks, they’re on their own. There’s no landlord to call, and it’s not mom and dad’s house.

Paying over the asking price and waiving the home inspection can add substantial financial burdens from future unexpected or latent repair costs. Having a home inspection performed by a professional home inspector, while not a guarantee that everything will be perfect, can greatly reduce the risks of unexpected repairs and costly surprises for new homebuyers in Rochester, MN, Owatonna, MN, and Faribault, MN.

The risks of waiving the home inspection

A recent article published by msn.com states that 77% of homebuyers face unexpected repair costs in the first year of ownership. This startling revelation helps to underscore the importance of enlisting the professional services offered by a trained and impartial home inspector.

Spending half an hour during a showing or walkthrough with your dad or uncle “who knows things about construction” isn’t going to provide you with complete and objective insight into the condition of the home. By no means am I knocking dads and uncles, but I’ve seen a few that work in the construction business make an effort to point out everything that’s “not up to code.” While on the surface that may seem fine, in reality, it’s irrelevant for every home except brand new construction. Truth be told, codes change about every three years. A quick review of a home and the observance of some perceived code issues should never substitute for a thorough, professional home inspection. 

Utilizing a qualified home inspector to conduct a comprehensive home inspection will open your eyes to potential safety, health, and financial risks associated with the purchase of a new home. Home Inspectors have the required knowledge and tools to provide an honest, non-biased assessment of the condition of the home on the day of the inspection.

Get a home inspection anyway

 There are ways around waiving a home inspection contingency without losing an offer. One option is to present your offer to include a home inspection “for informational purposes only.” This doesn’t hold the seller responsible for any repairs or costs and can make sellers more likely to accept your offer. If there are any major issues pointed out by your home inspector, you can still back out if your realtor has worded your contract appropriately.

 Another option that we are seeing from homebuyers is a post-purchase inspection. By having a home inspection conducted after the fact, your home inspector will help you understand any issues or repairs that are needed. 

Home Inspections

The bottom line? When it comes to a home inspection, you’re not simply spending a few hundred dollars; you’re making a prudent decision to protect your home and future financial security. Whether a home inspection is part of your contingency or not, it’s always a wise investment when it comes to homeownership. No one wants to buy a money pit. Even if there are no major issues, you may learn some basic home maintenance, what makes your home tick, and maybe even create a future ‘honey-do’ list.    

  Visit our website to learn more or to schedule your home inspection. You can contact us today at (507)202-8942 or utilize our online “Schedule Now” feature to set up an appointment.


Is Your Passive Radon Mitigation System Good Enough?

Radon Mitigation

Knowing if your home has a radon mitigation system, and whether it's a passive or active system, is important. It's also important to know if the radon mitigation system in your Rochester, MN, Owatonna, MN, or Faribault, MN home is working correctly. When it comes to the health and wellbeing of your home and family, correct testing and accurate determination of radon levels is an essential process best left to licensed, experienced professionals.

 Since 2009, Minnesota has required that all new homes are built to be radon-resistant. New home construction must use techniques and materials to help reduce or prevent radon from entering the home. This is known as a passive radon system which relies on the natural upward thermal flow of sub-slab air and soil gases through a pipe and exhausted to the exterior of the home.

 What is a Passive Radon Mitigation System?

 A passive radon system starts with a perforated tile system set in a permeable soil, such as gravel or pea rock. This layer is covered and sealed with plastic before the concrete floor is poured. The system is sealed and vented, typically through a 3- or 4-inch PVC pipe. This pipe extends from under the concrete slab your home is built upon up through the home and attic space to the exterior. A passive system relies on the thermal stack effect, which means the system will naturally draw air upwards. The home acts as a vacuum on the soil due to internal/external temperature differences. There are many factors, including weather, storms, winds, barometric pressure, and types of construction, but that’s another discussion best left for another time.

 Could a passive radon system not be adequate enough?

 There are several factors that may result in a passive radon system not performing well enough to effectively reduce the radon gas levels in your home. Sometimes, systems are inadvertently obstructed during the construction process. An unobstructed system is critical for adequate and consistent air flow from under the slab.

For example, my home, built in 2017, is a 1-story slab on grade with a passive radon system installed. I oversaw the installation and confirmed that it was installed correctly. After living in my home for a few months, I tested the radon gas levels, and they came in at an average reading of 3.2 pCi/l to 3.8 pCi/l, depending on the season. This is pretty close to the EPA Action Level of 4.0 pCi/l.

Does this mean my home's system wasn’t built well? No… it means that the release of radon gas from the soils below my home is greater than what the passive system can handle. I’m sure there are cold and windy winter days where the average is above 4.0 pCi/l 

Is the system working good enough? The radon measurements are below 4.0 pCi/l, so some may say yes, the system is working as designed. Some may answer no, because the radon average measures pretty close to 4.0pCi/l. The honest truth? Even the best designed and installed passive system may not be adequate in all homes.  

In summary, a passive radon mitigation system doesn't always guarantee that your home is safe from dangerous levels of radon gas. The only way to accurately know the radon levels in your home is to have it tested.  HomePro Inspections employs the licensed and certified professionals required to ensure radon testing is performed correctly and all testing protocols are met.

Visit our website to learn more or to schedule radon testing for your home. You can contact us today at (507) 202-8942 or utilize our online “Schedule Now” feature to set up an appointment.