
Why Copper Water Lines Turn Green—and Valve Handles Corrode
Green staining on copper piping is common, but you shouldn't automatically dismiss it as harmless. Sometimes it is simply a stable surface patina. In other cases, it indicates an active leak, corrosive water, installation residue, or a deteriorating valve. Location, texture, moisture patterns, and the rate of change help distinguish cosmetic oxidation from a plumbing defect.
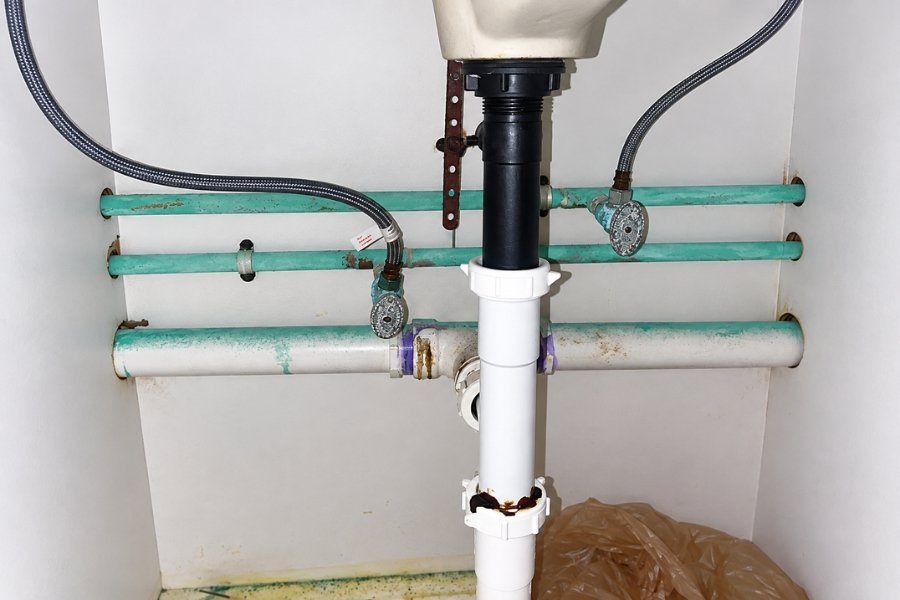
Corrosion on water pipes and shut off valves
Why Copper Water Lines Develop Green Corrosion
Copper reacts with oxygen, water, carbon dioxide, salts, and other compounds in its environment. These reactions form copper oxides and copper salts. The visible corrosion product is a green or blue-green material—often called verdigris. A thin, dry, uniform patina can slow further surface reaction. Thick, powdery, wet, crusty, or sharply localized deposits warrant closer attention.
Common causes
Condensation:
Cold-water pipes can “sweat” in warm, humid rooms. Repeated wetting keeps the exterior surface active and may produce green staining.
Slow leakage:
Small leaks at soldered joints, compression fittings, valve stems, or threaded connections leave mineral deposits and corrosion products as water evaporates.
Residual soldering flux:
Flux left on the outside of a joint can absorb moisture and attack nearby copper. Excess flux inside the piping can also contribute to localized corrosion.
Water chemistry:
Low or unstable pH, low alkalinity, dissolved oxygen, disinfectants, chloride, sulphate, temperature, stagnation, and flow conditions can affect copper release and pitting.
Erosion-corrosion:
Excessive water velocity, turbulence, sharp changes in direction, or poor workmanship may strip away protective films and create localized thinning.
Dissimilar metals:
Copper connected directly to a more active metal in the presence of water can create a galvanic cell. The less noble metal—often steel, zinc, or aluminum—typically corrodes faster.
External contaminants:
Cleaners, salts, fertilizer, masonry materials, damp insulation, soil, and other chemicals can attack copper from the outside.
Why Valve Handles Corrode
Valve bodies are commonly brass or bronze, while handles, screws, stems, and retaining nuts may be steel, zinc-plated steel, aluminum, or another alloy. This mix of metals explains why the handle may corrode even when the valve body looks serviceable.
Ongoing moisture:
Condensation, a packing-nut leak, or seepage around the stem keeps the handle and fastener wet.
Galvanic action:
Dissimilar metals touching in a damp environment can accelerate attack on the more active component.
Coating failure:
Scratches or aging plating expose the base metal, allowing rust or white, powdery oxidation to begin.
Corrosive surroundings:
Laundry chemicals, pool products, road salt, fertilizers, coastal air, and high humidity can shorten valve life.
Lack of operation:
A valve that remains untouched for years can seize as scale and corrosion build around its stem and internal parts.
How to Prevent Corrosion
Stop leaks promptly:
Repair dripping valve stems, loose packing nuts, failed joints, and pinhole leaks. Don’t just clean away the green deposit and assume the problem is fixed.
Control condensation:
Insulate cold-water piping with closed-cell pipe insulation, seal the seams, improve ventilation, and reduce indoor humidity where practical.
Use proper installation practices:
A qualified plumber should properly size piping, deburr cut ends, avoid excessive heat and flux, wipe completed joints clean, support piping properly, and protect it from incompatible materials.
Separate incompatible metals as required:
Use approved transition fittings or isolation methods appropriate for the piping system and local code requirements.
Evaluate the water chemistry:
If corrosion is widespread, recurring, or accompanied by blue-green water, a metallic taste, or pinhole leaks, arrange for laboratory testing and consult the water supplier or a qualified water-treatment professional. Treatment should be based on test results—not guesswork.
Protect valves from harsh environments:
Keep corrosive chemicals away, control humidity, and replace severely rusted or seized valves with approved, high-quality components.
Exercise accessible shutoff valves:
Operate them gently at intervals recommended by the manufacturer or plumber. Never force a seized valve; it may break or leak.
Inspect periodically
Check exposed piping, shutoffs, water heaters, utility rooms, crawlspaces, and under-sink areas for signs of moisture, deposits, staining, or corrosion.
When Is Green Corrosion a Concern?
Recommend further evaluation when deposits are wet, increasing, concentrated around a joint or valve stem, accompanied by pitting or wall thinning, or present with staining on nearby finishes. Bulging, flaking, cracking, a seized shutoff, reduced flow, repeated pinhole leaks, or visible dripping also warrant prompt attention.
Summary
A home inspection is visual and non-invasive. Surface color alone does not reveal the remaining pipe-wall thickness or the exact water chemistry. If conditions appear active or significant, have a licensed plumber determine the source, make repairs, and assess whether water testing or broader piping replacement is warranted.
At HomePro Inspections, we are trained to identify these issues during home inspections. We document any problems and recommend a qualified professional for resolution.
Visit our website to learn more or to schedule your home inspection in the Rochester, Owatonna, and Faribault, MN areas. You can contact us today at (507) 202-8942, email us, or use our online “Schedule Now” feature to schedule an appointment.