Your Home Needs to Breathe

Over time, builders have tightened and improved the construction of new homes to conserve energy and maintain warmth. Windows and doors are more efficient, and air sealing has reduced random sources of air infiltration to almost nothing. As a result, it is harder for our homes to breathe. A fresh air vent helps solve this issue by channeling fresh outdoor air to specific areas of the home. The professional home inspectors at HomePro Inspections want you to know that the more you do to help your homes breathe, the healthier the air is for you.

 Gas-burning appliances such as furnaces, water heaters, fireplaces, stoves, ovens, and clothes dryers need a continuous supply of oxygen. Some people may argue that having a vent that brings cold air into their home during the frigid dead of winter is unnecessary, but this vent is actually supplying the home with the combustible oxygen it needs to create a safer and healthier indoor environment.

 How do fresh air vents work?

When explaining fresh air vents to my home inspection clients, I use an example from my childhood in a 1950s vintage rambler home. Back then, we sat on the hardwood floor in the living room to watch the old black-and-white TV. When the furnace kicked on in the utility room, you could feel the cold air move along the floor from under the front door to the cold air return across the room.

 Fresh air vents facilitate the ventilation of homes and gas appliances by directing airflow to areas of the house that require it most. They are usually located in the utility or mechanical room where there’s a furnace, water heater, and possibly a gas dryer. They supply the air for proper combustion and prevent backdrafting and carbon monoxide buildup.

 What is backdrafting, and how does it occur?

For example, if someone is cooking and running the exhaust vent in the kitchen while the exhaust vents in two of the three bathrooms are in use and the clothes dryer is running, all of these appliances draw air from within your home and vent it outside. Now, if the old water heater kicks on and has a standard atmospheric vent, the exhaust naturally rises up and out of the vent through the roof. When a combustible appliance, such as a water heater or a furnace, draws its exhaust back into your home instead of naturally venting out of the roof, this phenomenon is known as backdrafting.

 Why fresh air vents are important.

The gas appliances in your home use oxygen as part of the combustion process. Without a source of fresh outdoor air from a vent intake, they would consume the available oxygen, which is highly problematic. This would reduce the available oxygen supply for the home's occupants and potentially lead to an unhealthy accumulation of carbon monoxide. A fresh air vent provides the necessary replacement combustion air for your appliances to operate correctly and the occupants of your home to live safely.

 How to identify a fresh air vent.

Our home inspectors confirm the presence of a fresh air vent during a home inspection. This vent is typically located in the utility room, next to the furnace and water heater. The utility room often also contains a clothes dryer and a washing machine.

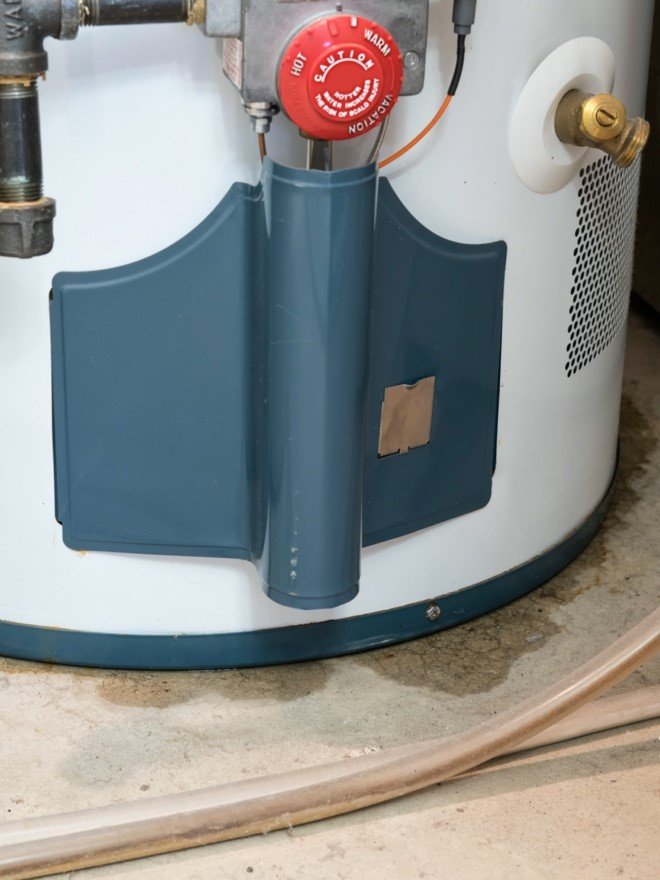
A fresh air vent in a utility room

The fresh air vent will be a 6- to 8-inch duct that extends down to the floor, typically with a loop at the bottom, resembling the letter “J.” This duct may extend through the home and into the attic or to a wall vent. Extending the vent to the attic prevents wind from directly blowing into the vent.

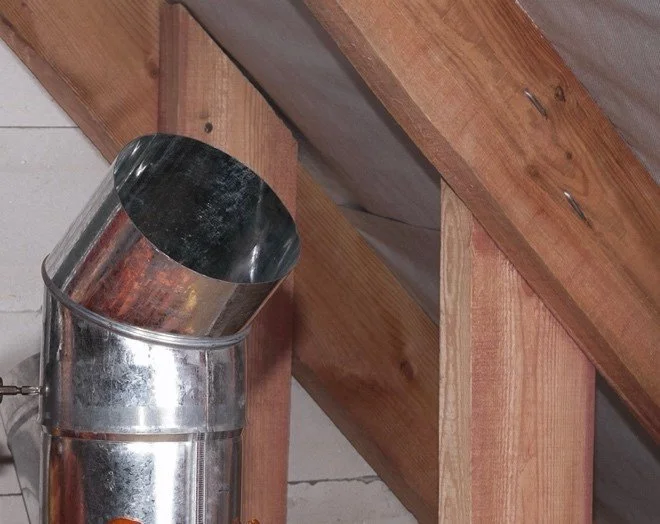
 A fresh air vent in an attic

 What about the cold air?

Occasionally, we find rags, towels, or foam balls stuck in the utility room's fresh air vents during a home inspection. Homeowners who do not understand the purpose of these vents think they are doing the right thing by blocking the cold air entering the home. Our home inspectors will explain the reasons for the vent and why the cold air is necessary.

 Summary

It is essential to have clean air in your home for breathing. Outside fresh air replaces the expelled dirty air. Remember, don’t block that vent; ensure it is clear to allow air to flow into your home.

 At HomePro Inspections, our home inspectors are trained to inspect your HVAC systems and identify defects. Any issues are documented in your home inspection report and recommended for resolution by a qualified professional.

 Visit our website or schedule your home inspection in the Rochester, Owatonna, and Faribault, MN, areas. You can also contact us today at (507) 202-8942, send us an email, or use our online “Schedule Now” feature to schedule an appointment.

Mold Testing Guidance and Considerations

Mold on basement utility room wall

Mold is everywhere, and it can exist in your home year-round. It can easily survive during cool, rainy seasons and spread explosively during the hot, humid days of summer. It is important for homeowners to understand the potential levels of mold in their home and know what to do if it is affecting them and/or their family. The professionals at HomePro Inspections hope the following guidance helps you understand the dangers of mold and highlights the signs that indicate you may need to consider mold testing or mitigation.

 What is mold?

 Mold is a unique organism that is present almost everywhere. Its role involves the breakdown and decomposition of dead and dying materials in both indoor and outdoor environments. In the grand scheme of things we call nature, mold has a necessary purpose.

 Wet basements, crawlspaces, and poorly ventilated attics are prone to mold, also known as “microbial growth.” Areas with persistent leaks can create ideal conditions for mold growth. These places often have a recognizable damp and musty smell. If you notice this odor in your home, consider mold testing.

 When and why would you want mold testing performed in your home?

If you suspect there is mold in your home, it is important to address the source and fix the problem to prevent harmful exposure to your family. You can confirm the effective resolution of the issue by conducting mold testing afterwards.

 Mold problems can occur when people are exposed to high levels of microbial spores, but not everyone is affected by mold in the same way. Individuals with allergies, weakened immune systems, infants, and the elderly are most susceptible to mold exposure. 

 When a home buyer, especially anyone with asthma or other health issues that elevated mold levels in the air can aggravate, finds a home they would like to purchase, mold testing should be seriously considered. We tailor our mold testing services perfectly for buyers seeking to ensure there are no mold issues.

 Another common reason for mold testing is when people move into a new home or have visitors who experience health issues not encountered elsewhere. We recently performed mold testing for a couple with a young grandchild who had no problems in the rest of their home, except in the basement. When the child entered the basement, they developed red, scratchy eyes and began to sneeze.

 Wet walls with mold

 Here’s a brief explanation of our mold testing.

Any type of mold growing in your home can cause health problems, and the effects of mold exposure can differ significantly from person to person. If you think your home has a mold problem, consider having it tested. Sometimes the problem is obvious, but sometimes testing or sampling is the only way to determine if there is an actual mold issue.

 After scheduling an appointment, one of our technicians will come to your home to perform mold sampling. They will first discuss any concerns you may have about mold and then inspect the home for any potential problem areas. 

 When we conduct our mold testing, we may use two types of mold sampling. The most common method is an air sample, which detects mold spores in the air in the sampled area. The other method involves taking a swab sample from a surface and examining the mold microbes present in it.

 It must be noted that mold testing alone cannot determine how you or your family will react to or be affected by mold growth in your home. The best first step in protecting your family is identifying and removing the source and root cause of the mold spores.

 How long does mold testing take, and is it accurate?

Our testing procedures and process typically take about 30 minutes on average. In addition to the sampling, the visual inspection is fairly routine. However, if there are obvious issues and additional sampling requires documentation, it can take longer.

 Once we complete and document the testing, we send the samples to a lab for analysis and reporting. The reports detail any molds found in the samples, common areas where they develop, and common symptoms of exposure to the molds identified.

 Recent innovations in microbial testing have significantly improved accuracy to approximately 99%. By following protocols and minimizing user error, testing laboratories can accurately identify mold problems and determine the types of mold present.

 In Summary

If you suspect a mold problem, you should have mold testing done in your home. Regardless of whether the problem is obvious or just something in the air, testing can help you determine if there is an issue. Mold testing is relatively inexpensive and is the first step in deciding your course of action.

 Visit our website to learn more or to schedule mold testing in the Rochester, Owatonna, and Faribault, MN, areas. You can also contact us today at (507) 202-8942, send us an email, or use our online “Schedule Now” feature to set up an appointment.


My Bathroom Has Some Bad Smells – What Could That Be?

There may be times when your bathroom smells terrible. Nobody's been in there for a while, but it still smells awful. Scented candles and air fresheners can help mask offensive odors, but if it’s the stench of sewer gas, it signals a problem that requires immediate resolution. During a home inspection, our HomePro Inspections professionals will record any odors they detect and include this information in your home inspection report.

 The Usual Suspects

·         The toilet

·         The sink drain

·         The shower drain

·         The bathtub drain

·         The hydromassage tub

·         Plumbing vents

·         Crazy Uncle Harland (just kidding, but sometimes he visits).

 Inspecting these areas can help narrow down the culprit and give you a place to start. It’s important that you address sewer gases promptly; don’t ignore these smells.

 You may have a more significant issue if you notice smells and gurgling noises in your sink or toilet drains.

 Understanding Why This is Important

Nobody wants to smell sewer gases in their home. If you smell sewer gases, there is typically an issue with the drain or a vent pipe, damaged or broken seals, or buildup in the overflow of a sink. If you have thoroughly inspected and evaluated “the usual suspects” but can’t find the cause, you may need to call a professional.

 Some Potential Causes of Sewer Gas Odors

 The Toilet

If you inspect your toilet and find water pooling around the base, you could have a broken or damaged seal. A broken seal could allow sewer gases to escape into the room.

 A damaged toilet seal on the floor

There is a seal between the toilet and the floor flange. A broken or loose seal could allow sewer gases to enter the home. Leaking water may also result in organic growth, which can cause a foul smell.

 Organic growth on sink surfaces

Sink Drain

If there are any kinds of organic growth or buildup, such as films, mold, or mildew, they may smell like sewage. A clogged drain may also be the source of a foul smell. There are a number of commercially available products that can remove gunk from clogged drains. Do your research to ensure you are purchasing the appropriate product to clean up these issues.

 Bad odors can occur if the P-trap or an S-trap in your sink is dry, dirty, or missing. The P-trap is designed to hold water. If you don’t use a sink for a long time, the water may evaporate from the P-trap, allowing sewer gases to enter the room. Simply run some water down the drain to allow the P-trap to fill. Dirty traps can also result in sewer gases escaping. If there is no trap at your sink, install one to contain sewer gases.

 Your bathroom sink may have an S-trap if you live in a very old house. S-traps, by nature, can sometimes siphon some or all the water out of the trap when draining.

 A clogged shower drain can result in sewer smells

 Shower and Bathtub Drains

When we shower, dirt from our bodies can accumulate in the corners and surfaces of our shower pans. Sometimes, you'll see an orangish or pinkish film in your shower. This is organic growth and can result in sewage smells. To keep these films from accumulating, sprays are available that you can use to treat your shower daily or weekly. Much like the bathroom sink, hair and scum can clog a shower or bathtub drain. Dirty traps can also result in sewer gases escaping.

 Jacuzzi® or Hydromassage Tub

These spa-type tubs have a system of pipes and valves that allow water and air to be forced through the tub water. Removing all the water from these lines when the tub is drained is difficult. Water that remains can lead to organic growth within the lines, potentially causing unpleasant odors. When you use your hydromassage tub after it has been sitting for a long time, you may notice bits of gunk or black flakes circulating in the water. These are fragments of organic debris that have been dislodged by the force of the water. You can use a commercially available cleaner to help keep your hydromassage tub free of organic growth.

 Plumbing Vents

Plumbing vents facilitate the backflow of air into your plumbing drain system and the venting of sewer gases to the exterior of your home. Improperly installed or blocked vents will not allow the sewer gases out and may result in gurgling at your sinks or toilets. Plumbing vents allow water to flow smoothly through your drain system and vent the sewer gases out of your home.

 In some cases, such as renovations or very old homes, air admittance valves may be used. You may find an air admittance valve underneath your sink or venting to an attic space. As with anything mechanical, these can also fail over time. Improperly installed air admittance valves can result in sewer gases entering your home through drains.

 Summary

If the recommendations above do not solve your sewer gas problems, you may have to call a professional. Ignoring sewer gas smells can result in bigger issues down the road, so you will want to investigate and act sooner rather than later.

 As part of a home inspection, our inspectors will inspect the visual components of your plumbing system and check for any unpleasant smells. Any issues found will be documented in your home inspection report.

 Visit our website to learn more or to schedule your home inspection in the Rochester, Owatonna, and Faribault, MN, area. You can contact us today at (507) 202-8942, send us an email, or use our online “Schedule Now” feature to schedule an appointment.

Expansive Soils, Freezing Temperatures, and How They Can Affect Concrete

During a home inspection, the professionals at HomePro Inspections check for a multitude of potential issues. When it comes to sidewalks, driveways, and concrete slabs, we note any cracked concrete we may find. Truth be told, in this part of the state, it is safe to say that there are two kinds of concrete: the kind that is cracked and the kind that is going to crack.

 What are expansive soils?

Expansive soils are known for their ability to swell and shrink in response to changes in moisture levels and temperatures. In this part of the country, blue and green clays are problematic. These soils can cause severe problems for structures built on them, as they have the potential to crack foundations and damage sidewalks and roads. Engineers typically use special foundations and construction techniques to mitigate the risks posed by expansive soils. However, even with these precautions, damage from expansive soil can still be a problem.

 How does expansive soil cause problems for concrete slabs?

Minnesota's freezing temperatures can result in dramatic heaving, movement, and cracking if the soils below a concrete slab are not chosen and appropriately prepared and have proper drainage. When we perform a home inspection, our inspectors at HomePro Inspections are looking for and documenting any potential issues with concrete slabs.

 How does expansive soil affect concrete slabs?

When concrete cracks, it's usually because of expansive soil. Also known as "swelling clay," expansive soils can wreak havoc on everything from sidewalks and patios to foundations.

 Expansive soils contain minerals that absorb water and expand when wet. This can put tremendous pressure on concrete, causing it to crack and crumble, rise, or settle. In some cases, the damage can be so severe that the entire slab needs to be replaced.

 There are several ways to deal with expansive soil, but the most important thing is to make sure that any concrete slab you pour has the proper base materials, drainage, and reinforcement. This will help reduce the risk of cracks and provide some protection if they occur. Consult a qualified contractor before beginning any concrete project in an area with expansive soil.

 How do freezing temperatures affect expansive soil?

The problem is that concrete is porous, meaning it can absorb water from the ground below. When this water freezes, it expands, putting pressure on the slab above. Over time, this can cause cracks to form in the concrete. In severe cases, the entire slab can even collapse. If you live in an area with cold winters, keep an eye on your concrete slabs and take steps to prevent them from being damaged by freezing temperatures.

 Why is it important to repair cracks in concrete?

Concrete slabs are subject to all sorts of stressors, including expansion and contraction due to temperature changes, vehicle weight, and even regular foot traffic. Over time, these stresses can cause cracks to form in the concrete.

 While some cracks are purely cosmetic, others can pose a severe safety hazard. For example, if a crack is wide and deep enough, it can cause a trip-and-fall accident. In extreme cases, cracked concrete can even collapse and settle entirely. That's why it's important to repair cracked concrete as soon as any cracks are discovered. By filling in the cracks, you'll not only improve the appearance of your concrete, but you'll also help to prevent further damage due to freeze/thaw cycles. In our home inspection reports, we define concrete cracks as maintenance items or recommended repairs to help our clients prioritize how these issues are resolved.

 What are the best methods for repairing cracks in concrete?

Concrete is a sturdy material that can last for many years with proper care. However, even the most well-constructed concrete slab is not immune to cracks. Despite their minor appearance, small cracks can grow larger and cause severe damage if left untreated. Fortunately, there are several effective methods for repairing cracks in concrete.

 One popular method is to fill the crack with flexible epoxy resin. This type of resin is designed to expand and contract as the temperature changes, helping to prevent the crack from reappearing. Epoxy resins are available in various colors, so you can also use this method to improve the appearance of your concrete.

 Another option is to fill the crack with a polymer-based concrete leveling compound. This compound can be applied using a simple caulk gun, and it will harden in a few hours. Once it's hardened, the concrete leveling compound will help level out any uneven surfaces and prevent the crack from spreading.

 Conclusion

Cracked concrete is not only unsightly but can also pose a serious safety hazard. Fortunately, there are a number of effective methods for repairing cracks in concrete. By filling in the cracks, you'll not only improve the appearance of your concrete but also help prevent further damage and keep your sidewalks, driveways, and patios safe.

 HomePro Inspections' professionals dedicate themselves to providing the most comprehensive home inspection available. Visit our website to learn more or to schedule your home inspection in the Rochester, Owatonna, and Faribault, MN, area. You can contact us today at (507) 202-8942, by email, or use our online “Schedule Now” feature to schedule an appointment.


The Importance of a Clean Furnace Air Filter

When it comes to properly maintaining your furnace, it’s best to change the furnace air filter at least once a month or as often as the manufacturer recommends. What can happen if you don’t? Your furnace will work harder than necessary, consume more energy, and potentially experience premature failure. Additionally, a dirty furnace filter will make the air and everything in your home dirtier, including you. The home inspection specialists at HomePro Inspections want you to understand the impact of a dirty furnace filter on your health, home, and budget.

 Dirty furnace filters can lead to several problems, including:

·         Reduced Airflow: Dirt and debris clogging the furnace air filter blocks airflow, forcing the furnace to work harder and longer than necessary.

·         Health Issues: A dirty furnace filter can be a breeding ground for bacteria and allergens, which can cause respiratory problems and other health issues.

·         Higher Energy Bills: As previously mentioned, a clogged furnace filter increases the furnace’s workload, resulting in higher energy bills. A dirty furnace filter will cost you more in electricity and fuel in the long run. In fact, according to Energy Star, a dirty furnace filter can increase energy bills by 5% to 15%.

·         Premature Furnace Failure: Premature failure is one of the most common problems associated with a dirty furnace air filter. When the filter becomes clogged, it restricts airflow to the furnace. This causes the furnace to work harder than necessary, which puts extra strain on the unit and can lead to a breakdown.

 When replacing a furnace air filter, select the correct size and style.

There are various types of furnace air filters available on the market. The most crucial factor to consider when selecting a furnace air filter is the size of your furnace. You want to ensure you get a filter the same size as recommended by your furnace manufacturer.

 Another thing to remember is the type of furnace air filter you select. Pleated furnace air filters, made of fiberglass or synthetic material, are the most common type. These filters trap dust and other particles in the air, making them ideal for people with allergies or respiratory problems.

 If you have pets, consider a HEPA air filter. You can choose from a variety of HEPA-type air filters to find the most effective furnace air filter that fits your needs. These filters effectively eliminate 99.97% of airborne particles, rendering them perfect for individuals with pets or allergies.

 Summary

It's essential to replace your furnace air filter regularly, preferably every month or as the manufacturer recommends. A clean furnace air filter will help ensure your furnace runs efficiently and keep your home healthy. A dirty furnace filter can cause many problems, from increased energy bills to respiratory issues. So, change your furnace air filter regularly and keep your home happy and healthy.

 As part of a home inspection, our inspectors check to see that the furnace air filter is correctly sized, clean, and serviceable. If not, we recommend maintenance in our inspection reports.

 Visit our website to learn more or to schedule your home inspection in the Rochester, Owatonna, and Faribault, MN, area. You can contact us today at (507) 202-8942, by email, or use our online “Schedule Now” feature to schedule an appointment.

Fall Maintenance Checklist

We have beautiful weather this time of year, but winter is coming, so now is the perfect time to take care of those outdoor maintenance items before the snow begins to fly. Taking care of your home, especially the outside stuff before the weather gets cold and miserable, is well worth the time and effort.

 The following are a few maintenance items that the professionals at HomePro Inspections would like you to consider in order to better care for and protect your home for the upcoming winter season.

 Remember, as with everything, know your limits and skill level. If you are uncomfortable performing any of the inspection items on the checklist, especially when it comes to accessing your roof, gutters, or downspouts, please hire a professional.

 Roof

·         Inspect your roof from the ground with binoculars, looking for any damage. Look for any damage to the shingles. Make sure that any tree branches that may be touching the roof are trimmed back. 

·         Clean your gutters and downspouts after the leaves have finished falling from the trees. Even if you have gutter guards, small debris can pile up in the valleys or at the downspouts. Plugged or restricted gutters can lead to ice dams in the winter. Ensure your downspouts and discharge chutes are unobstructed and directed away from the foundation.

 Outdoor Maintenance

·         If you have an irrigation or sprinkler system, you want to have it serviced and drained before the temperatures drop into the freezing range. 

·         Remove your garden hoses. If your faucets cannot drain, they can freeze and burst a pipe. Even frost-free faucets can freeze if the water is not allowed to drain due to frozen water in a garden hose.

·         Remove pumps and drain from any outside water features, such as garden ponds.

·         If you have an unheated garage, drain utility sinks and winterize them.

·         Seal any gaps or cracks on the exterior of your home. Look for areas around your windows and doors, as well as any vents, pipes, or trim.

·         Inspect your window screens. Please remove them and have them repaired and ready for spring.

·         Inspect and replace any damaged or worn weather stripping around doors and windows.

·         Clean your air conditioner coils and replace damaged insulation on your refrigerant line. Air conditioners do not need to be covered. Covers can trap moisture, which can result in rust and corrosion.

 Heating, Exhaust, and Ventilation

·         Clean your home heating system’s fresh air vents and combustion make-up air vents.

·         Clean your dryer vents. If you have any flexible plastic vents, consider replacing the material with solid metal smooth-bore dryer venting.

·         Inspect and clean the vents, filters, and core in your air exchanger system if one is installed.

·         Remove debris, such as hornet and wasp nests, from your kitchen or bathroom exhaust vents, and ensure that the dampers work freely. Do this for all external vents.

·         Have your furnace or boiler professionally maintained. A clean system will operate more efficiently and reliably.

·         If your thermostat has batteries, replace them. If the batteries fail in the middle of the night or while you are away on a winter vacation, your furnace will stop functioning.

·         Replace your furnace filter. Whether it’s a 12-month, 3-month, or 1-month filter, it’s essential to change them on schedule. A plugged filter will keep your furnace from operating efficiently and correctly.

·         If you have a wood or gas fireplace, have it professionally cleaned and maintained. Don’t forget about the chimney or through-wall exhaust venting.

 Interior Maintenance

·         Change the batteries in your smoke and carbon monoxide alarms.

·         Clean your refrigerator and freezer cooling coils.

 Summary

Your home is your most important asset. Maintained and properly functioning home systems will help you manage costs and keep your home looking great. Although the above list is only partially comprehensive, it will give you a great start and some guidance.

 At HomePro Inspections, our home inspectors are trained to inspect all areas of the house. If left unchecked, deferred maintenance can turn a relatively simple project into a more serious repair. Any issues found are documented in your home inspection report and recommended for resolution by a qualified professional.

 Visit our website to learn more or to schedule your home inspection in the Rochester, Owatonna, and Faribault, MN areas. You can contact us today at (507) 202-8942, by email, or use our online “Schedule Now” feature to schedule an appointment.

Is There a Mold Problem in My Home?

As homeowners and homebuyers become more educated about home ownership, a common question our home inspectors hear during a home inspection is whether or not there’s microbial growth, or, as most people refer to it, mold, in their homes. If you have concerns about mold in your home or think you need mold testing, the professionals at HomePro Inspections have some information for you to consider.

 Should I Get Mold Testing?

As home inspectors, we see a wide variety of mold during our home inspections. Some issues are visually apparent, such as wet basement walls, moisture under kitchen or bathroom cabinets, or an obvious leak. It can also be a smell in a damp basement that alerts the homeowner or home inspector that there may be a mold issue. We’ve also had clients tell us that they have someone in the family who gets stuffed up and has allergic reactions, but only when they’re in the basement.

 Wet Areas and Visual Growth

If you have experienced flooding or discovered an area with leaks or water damage, consider mold testing. Consistently wet areas are prone to reasonably quick mold growth, depending on the conditions. Drying areas within 48 hours can reduce the risk and prevent future mold issues. Vacuum up standing water, pull back carpets, and run fans and dehumidifiers to dry the area as quickly as possible.

 Managing the source of water intrusion is critical. If you have poor roof water runoff management or drainage issues, it's crucial to have them corrected as soon as possible. On occasion, I’ve found situations where a homeowner is using fans and dehumidifiers in a wet basement to deal with the symptoms instead of addressing the root cause of the problem.

 Inadequate Ventilation

There are times when your home inspector points out inadequate ventilation in a basement. This is generally due to a lack of air returns in each room of the basement. It can also occur when the supply vents are closed on purpose because “it gets too cold in the basement when the air conditioning is running.”

 Since cold air is denser than warm air, it wants to seek out the lowest area. Lack of ventilation and air exchange can lead to higher than recommended humidity levels. There have been times, when performing a home inspection, when one of our home inspectors has entered a basement where it’s cold, damp, and exudes a musty smell. These conditions immediately alert the home inspector to the potential signs of microbial growth.

 The Environmental Protection Agency (EPA) recommends that the humidity levels in a home be kept in the 30% to 60% range to prevent possible mold growth.

 Health Concerns

Mold in a house may or may not cause health issues for everyone. I once had a home inspector on my team that didn’t need to conduct mold testing if he was doing a home inspection on a home that had mold in it. On one occasion, when I was training him, we entered a home, and within 5 minutes, he had watery, itchy eyes and was sneezing. I asked him if he was okay, and he said mold was probably in the home. Sure enough, we went to the basement, and there were signs of active mold growth on the basement utility room walls. I, on the other hand, did not react to the conditions. 

 How Much Exposure is Too Much?

Exposure to an elevated level of microbial growth or mold spores affects everyone differently. People with compromised immune systems, the elderly, the very young, and those with allergies can be prone to issues when exposed to mold. Symptoms can include watery eyes, runny nose, itching, difficulty breathing, wheezing, coughing, headaches, and fatigue. Continued and repeated exposures to poor indoor air quality can develop into more severe reactions over time. Molds such as Aspergillus and Stachybotrys may produce mycotoxins, which can be toxic to some people under certain conditions, resulting in serious illnesses.

 Summary

When purchasing a new home, people with potential health issues related to mold exposure should have mold testing conducted as part of their home inspection. If you see the warning signs, have flooding or water intrusion, or detect a damp, musty smell in your basement, there may be microbial growth. You’ll want to test for mold to ensure there are no issues.

 Visit our website to learn more or schedule mold testing in the Rochester, Owatonna, and Faribault, MN areas. You can contact us today at (507) 202-8942, by email, or use our online “Schedule Now” feature to schedule an appointment.

Keeping Your Basement Dry – Gutters and Downspouts

One of the most important yet commonly neglected fixtures on your roof are the gutters and downspouts. Some may question the importance of gutters and downspouts, as well as their maintenance, but HomePro Inspections wants you to know there’s a reason why you should have them on your home. These essential items are critical for managing rain runoff from your roof and keeping your basement dry. Our home inspectors, as part of a home inspection, evaluate the condition and function of the gutters and discharge chutes.

 Gutters and downspouts at the roof edge

 That’s a lot of water!

Did you know that on 1,000 square feet of surface area, one inch of rainfall creates 623 gallons of water? Imagine you have a 32-foot x 34-foot home with a 2-foot eave all around. That’s 1,368 square feet of surface area, and that’s not even considering the pitch of the roof. When a heavy rain drops two inches of rainfall on this roof, that equals about 1,700 gallons of water running off the edge! That’s a lot of water, and it has to go someplace, but where?

 Get that water away from my foundation!

The purpose of gutters, downspouts, and discharge chutes is to collect the water that runs off the roof and divert it away from the foundation. If the water is allowed to run off the roof and saturate the soil next to the foundation, it can lead to a wet basement. An even worse situation is when there are no gutters, downspouts, and discharge chutes, and the ground around the home slopes towards, rather than away from, the foundation. That’s why, except for extremely rare situations, gutters and downspouts are absolutely necessary.

 The photo shows wetness in a basement where the discharge chute had been removed and was lying in the shrubs. The downspout was dumping water right at the foundation’s corner.

 A case in point.

At a recent home inspection, one of our home inspectors noted that the gutters at the rear had some damage and were prone to leakage. In addition, the discharge chute was not extended far enough away from the foundation, and the soil sloped back towards the foundation. Furthermore, the runoff from the driveway was routed around to the rear of the foundation. In the inspection report, the home inspector documented all of this as needing correction.

In the basement, it was noted that there were a couple of areas at the rear of the basement where the carpet and sheetrock were wet. The home inspector also documented this as needing repair and noted they may need to have a basement waterproofing company install a water mitigation system.

 We recommended that they first correct the issues with the gutters and soil slope and then make sure that any water coming from the roof was flowing away from the home.

 Maintain your home’s gutter system.

Keep your gutters clean and discharge chutes in place. If you fail to maintain your system, you’re asking for trouble. Gutters that let water run over the edge are just as harmful as having no gutters at all. Gutters plugged with water and debris are heavy, and that extra weight can pull gutters loose and even cause them to separate and fall from the house entirely.

 Keeping gutters and downspouts clean can be achieved by physically removing the debris yourself or paying someone to clean them for you. For me, the height and pitch of the roof play a big part in whether I would tackle the project myself. You can also install a system that prevents the accumulation of leaves, twigs, and other debris in your gutter system. There are plenty of DIY and professional installations available.

 Conclusion

Having proper gutters, downspouts, and discharge chutes in place is your number one defense against a wet basement. Keep them clean and properly maintained, and they’ll do their job every time it rains. Remember, a one-inch rainfall equals 623 gallons per 1,000 square feet.

 Visit our website to learn more or to schedule your home inspection in the Rochester, Owatonna, and Faribault, MN areas. Contact HomePro Inspections today at (507) 202-8942, send us an email, or use our online “Schedule Now” feature to schedule an appointment.


The Right Way to Upgrade Two-Prong Outlets

When performing a home inspection on an older home, the inspectors at HomePro Inspections often encounter ungrounded two-prong outlet receptacles or ungrounded three-prong outlet receptacles. If it's a two-prong outlet, we will usually discuss with our client that it is ungrounded. If we find a three-prong outlet that is ungrounded (does not have a ground wire), we mark this as a defect needing correction.

Two-prong and 3-prong outlets

 Code changes

The National Electrical Code (NEC) has continuously reviewed the evolution of electrical development and installation to establish safety standards since the publication of the first edition of codes in 1897. An update to the code in 1947 required that circuits supplying electricity to laundry appliances had to be grounded. In 1956, an additional code change mandated that grounding was required for basements, porches, and other exterior areas where the potential for ground contact was likely. Requirements for the grounding of kitchen sink receptacles were added in 1959, and in 1962, a code update mandated the grounding of all outlets. Since then, codes have continued to evolve, and the safety of our home’s electrical systems has improved dramatically.

 Older Homes

We have many older homes here in Southeast Minnesota, and most of these homes have the older two-wire systems, where one wire is hot (ungrounded) and the other is common (grounded). The hot wire brings electricity to the electrical appliance or device, and the neutral wire returns electricity to the electrical panel. 

 Older homes will have two-prong outlets, which only have the hot and the neutral wire. Back in the mid- to late-60s, when appliances started providing chords with three-prongs, it was common for people to swap out their old two-pronged outlets with three-prong outlets.

 This was a quick and easy fix; however, it was an unsafe fix. The problem is that even though it looks like a grounded three-prong outlet, there is no ground wire in these old homes. The house I grew up in had two-prong outlets. I remember that around 1970, when my dad was doing some remodeling, we went through and installed three-prong outlets everywhere in the house. He was tired of having to find a “cheater” every time he wanted to plug in an appliance with a three-prong cord into a two-prong outlet.

 “Cheater plug”

 The Ground Wire

What exactly is a ground wire? The ground wire is used to ‘bond’ all metal non-current-carrying components back to the main panel. If a ground fault occurs, this wire will direct or carry the electrical flow back to the main panel, allowing a fuse to break or a circuit breaker to trip. An ungrounded outlet has no path back to the panel and may result in an electrical shock.

 How do you upgrade a two-prong outlet to a three-prong outlet?

As we have seen in many older homes, people simply replaced the old two-prong outlet with a new three-prong outlet. However, addressing the lack of a ground wire to the third prong requires further attention.

 One option is to completely rewire the house, removing the older two-wire system and replacing it with a new three-wire system. Unless you're doing a complete remodel of the house, however, this is an extremely expensive and cost-prohibitive task.

 The National Electrical Code provides more cost-effective options for replacing old two-prong outlets other than rewiring or running a separate ground.

 2017 Code Language:

406.4(D)(2) Non–Grounding-Type Receptacles. Where attachment to an equipment grounding conductor does not exist in the receptacle enclosure, the installation shall comply with (D)(2)(a), (D)(2)(b), or (D)(2)(c).

 (a) A non-grounding-type receptacle(s) shall be permitted to be replaced with another non-grounding-type receptacle(s).

 (b) A non-grounding-type receptacle(s) shall be permitted to be replaced with a ground-fault circuit interrupter-type of receptacle(s). These receptacles or their cover plates shall be marked “No Equipment Ground.” An equipment grounding conductor shall not be connected from the ground-fault circuit-interrupter-type receptacle to any outlet supplied from the ground-fault circuit-interrupter receptacle.

 (c) A non-grounding-type receptacle(s) shall be permitted to be replaced with a grounding-type receptacle(s) where supplied through a ground-fault circuit interrupter. Where grounding-type receptacles are supplied through the ground-fault circuit interrupter, grounding-type receptacles or their cover plates shall be marked “GFCI Protected” and “No Equipment Ground,” visible after installation. An equipment grounding conductor shall not be connected between the grounding-type receptacles.

 Informational Note No. 1: Some equipment or appliance manufacturers require that the branch circuit to the equipment or appliance includes an equipment grounding conductor.

 Informational Note No. 2: See 250.114 for a list of cord-and-plug-connected equipment or appliances that require an equipment grounding conductor.

 Evaluating Your Options

Option A states that you can replace your old 2-prong outlets with new 2-prong outlets. This does not add additional protection or functionality to your electrical system, but the new outlets will look, well, new.

 Options B and C are very similar, and they add GFCI (ground fault circuit interrupter) protection to those circuits.

Basically, if there is GFCI protection on those circuits, the NEC permits upgrading old two-prong outlets to three-prong outlets without adding a ground wire and by appropriately labeling those circuits as "GFCI Protected" and "No Equipment Ground."

Summary

The ground wire is the most critical safety feature of your home’s electrical system, but there are code-approved options if you want to upgrade your old two-prong outlets to three-prong outlets. We recommend that you contact a reputable licensed electrician for options on how to make these upgrades. In the end, you want your home and family to be safe.

 At HomePro Inspections, our home inspectors are trained to inspect all areas of the home. Your home inspection report documents any issues found and recommends their resolution by you or a qualified professional.

 Visit our website to learn more or to schedule your home inspection in the Rochester, Owatonna, and Faribault, MN areas. Contact us today at (507) 202-8942 or by email, and you can use our convenient online “Schedule Now” feature to schedule an appointment.


Is It Time to Upgrade Your Home's Thermostat?

Home thermostats have become more technologically advanced than they were a few years ago. Growing up, everyone had the little round Honeywell thermostat in their home. This simple little mechanical device that relied strictly on a mercury switch is ancient compared to the advanced, programmable smart thermostats available today. HomePro Inspections would like to share the advantages of today’s plethora of smart technology that you can use to manage the efficiency of your home’s heating and cooling systems, as well as the cost-saving benefits they offer.

 A home thermostat with intelligent technology

 I recently had a new furnace and heat pump combination installed in my home. I figured my Nest thermostat would handle the new system, but the technician said that even though Nest states that it will run a system with a heat pump, they're typically problematic. With that in mind, I had a new thermostat installed that matched up with the new system. 

 Much like my Nest thermostat, the new one is Wi-Fi capable and can tie into my home monitoring system. In addition to controlling heating and cooling, it also has the function of running the humidifier. This is nice because I don't have to mess with two separate control units to keep the humidity under control in the wintertime.

 Upgrading to a smart thermostat is a minor change that can provide many benefits, including energy efficiency, reduced heating and cooling costs, and increased comfort in your home. The following are some considerations regarding whether or not you should update your home’s thermostat.

 Convenience

You can control smart thermostats either at the control panel or remotely using your smartphone. This makes it possible to control your home’s temperature, no matter where you are. Using the thermostat app, you can adjust your home's temperature when you are away. The primary reason for this convenience is also to provide a consistently comfortable environment in your home.

 It is also important that I can monitor my home’s temperature when I am traveling and make adjustments according to changes in the weather.

 Efficiency

The potential to increase the energy efficiency of heating and cooling your home is one of the most compelling reasons to upgrade a thermostat. The old mercury switch-style thermostats do not have the technology to efficiently keep temperatures stable. They tend to lag and overshoot their set points. Programmable thermostats allow you to program and customize your heating and cooling based on your family's lifestyle. These newer thermostats can also monitor and learn your habits, thus increasing efficiency.

 With energy efficiency comes cost savings. Optimizing your heating and cooling schedules can greatly reduce your energy consumption and save you money. Energy-efficient thermostats have the potential to save you between 10% and 15% on your heating and cooling costs. Reducing your energy usage also has a huge impact on our environment.

 Summary

With the technology available, you can positively impact the environment, save money on your heating and cooling costs, and make your home energy efficient and more comfortable for you and your family. The money you save by installing a new thermostat will outweigh the initial cost of upgrading.

 At HomePro Inspections, our home inspectors are trained to inspect all areas of the home. Your home inspection report documents any issues found and recommends their resolution by you or a qualified professional.

 Visit our website to learn more or to schedule your home inspection in the Rochester, Owatonna, and Faribault, MN areas. Contact us today at (507) 202-8942 or by email, and you can use our convenient online “Schedule Now” feature to schedule an appointment.


What Does “At or Near End of Its Lifespan” Mean?

Occasionally, during a home inspection, the inspectors at HomePro Inspections come across something that, despite being functional, is at or near the end of its lifespan. So, precisely what does that mean? How do we explain it, and what should a homebuyer do with that information?

 A furnace near the end of its lifespan

 What does “end of lifespan mean”?

Our standard of practice requires us to report on things near the end of their service life. Various home inspectors may say it differently, but it means the same thing. Everything in a home has a life expectancy. Nothing lasts forever. We commonly use this phrase when it comes to appliances such as heating systems, water heaters, air conditioners, or roofing and exterior components.

 I wrote a blog post in December 2023 discussing standard life expectancies. That blog shares a chart from internachi.org that shows almost every component of your home, as well as the average standard life expectancy.

 Over the years, as a homeowner, I've replaced roofs that had 30-year shingles that only lasted 19 years and “new” furnaces in as little as eleven years. And then there’s the opposite: I recently purchased a property that has a furnace and air conditioner that are 25 years old. They’re well past their life expectancy, but they’re still working just fine.

 About 10 to 15 years ago, I inspected a home built in 1953. It still had the original furnace. This was a pre-listing home inspection for an estate sale, and the daughter told me that her father was an engineer and took great pride in keeping that furnace running all those years. Although it was running quite well, it was probably only about 10% efficient. The daughter informed me that they planned to replace it with a new system. 

 How do I use this information?

If your home inspector documents that some component of your home is at the end of its lifespan, they are making that comment based on standard average life expectancies. This statement contains information that you can use when making a decision about your home. This is not an action item that necessitates replacement.

 A good example would be an older water heater. I might document that it was near the end of its lifespan, but I would also explain to the client that it's not leaking, it's not rusty, it has a nice flame, and the burn chamber is not all corroded. Knowing that it is old, I would start to budget for its replacement sometime down the road.

 Should you use this information in your negotiations?

It would be best if you discussed this with your real estate professional. It's probably not a good idea to ask for something to be replaced simply because it's old. If you're buying an older home, there will be a wide range of components that are at various stages of life. Your best bet is to buy a home warranty for your new home. If something breaks or fails during the policy period, it may be eligible for a complete replacement.

 Summary

We want you to understand that home inspectors lack the ability to predict how long a given appliance or component may continue to perform its function. That’s why we carefully inspect your home, and if something is “at or near end of its lifespan,” we make a note so you have the information you need to make future decisions.

 At HomePro Inspections, our home inspectors are trained to inspect all areas of the home. Your home inspection report documents any issues found and recommends their resolution by you or a qualified professional.

 Visit our website to learn more or to schedule your home inspection in the Rochester, Owatonna, and Faribault, MN areas. You can contact us today at (507) 202-8942 or by email, and you can use our convenient online “Schedule Now” feature to schedule an appointment.


Oh No, I Have a Water Leak!

Discovering a water leak in your home and dealing with the repairs and cleanup can be a highly stressful event. Whether the water leak is due to a burst pipe, a failed pipe fitting, or a slow leak from a sink, toilet, tub, water heater, or appliance, you’re facing a situation that requires immediate action and thorough remediation. The professionals at HomePro Inspections have a few suggestions they would like to share with you if and when you face a water leak problem.

 After the initial shock, it’s common for folks to grab a bucket and go into damage control, but it can be a challenge to know what to do first or where to start. As bad as the situation may initially appear, there are a few courses of action you can take to help get you through the process and minimize the problem as much as possible.

 Let’s start by assessing what type of water leak you may have.

 Low-Damage, Low-Cost Water Leak

These types of water leaks usually don’t cause damage, but they can be inconvenient and can cost you time, money, and energy to locate the source. There’s an obvious water leak somewhere, and it’s wasting water, increasing your water and sewer bill. Perhaps it’s the sprinkler system, the water softener, or a rarely used toilet. The water leak may be difficult to pinpoint, but you can hear water running in the pipes somewhere in your home.

 Water Meter

 Where to Start

·        Check and shut off all hose bibs, interior faucets, showers, and sprinkler systems. 

Turn off all faucets or valves connected to the water system. Once you’ve done that, if you still hear water running, you need to systematically search for the source of the water leak. This can take some time and vary in complexity, depending on your home.

 ·        Locate and check your water meter.

After shutting off the water sources, locate and check your water meter. Water meters vary, so you may see something like an odometer. Some water meters have small dials, or icons, that will indicate low flow. Learn more about how to read a water meter here. If the indicator indicates flow, you still have a water leak somewhere in your home.

 ·        Shut off the water supply to your toilets.

Water leaks from toilets are typically the most common source of non-damaging water leaks. When checking multiple toilets, turn off the water source for each one separately, and then check the flow indicator on your water meter. If the indicator has stopped after shutting off a particular toilet, you’ve found the culprit. If the indicator still shows a low flow, there’s still a water leak.

 ·        Shut down all other water-using appliances.

One by one, shut off the water supply to any appliances or devices that use water. Continue checking as you did with the toilets until you find the water leak. If the water leak is still undetectable, maybe it’s time to call your favorite plumber.

 Moderate-Damage, Moderate-Cost Water Leaks

Whether they’re unnoticed or ignored, moderate-damage water leaks can result in significant damage. It could be a small water leak next to a shower stall, a drip from the dish washer or sink, or a wet spot on the basement ceiling. While these types of leaks don’t look all that severe on the surface, they could be developing into a much bigger and more serious problem in the walls or ceilings.

 Water leak at the basement ceiling and wall

It should go without saying: if you notice a new water leak, deal with it right away! Repeated and continuous water leaks, even if they appear to be small, typically don’t go away on their own. Ignoring them can be a big, and costly, mistake.

 Where to Start

·        Turn off the water source.

Check to see if there’s a water valve at the source that can stop the leak. If there is no valve, you need to shut off the main water valve.

 ·        Clean up the mess immediately.

If you catch a water leak soon enough, the mess may be minimal, but you should clean it up immediately. Failure to dry up a water leak can result in mold or mildew. Disinfect the area if possible, and get a fan and/or dehumidifier going as soon as you can.

 If any organic growth has started, be conscientious and take precautions to minimize spreading mold spores throughout your home. Protect yourself by wearing the appropriate protective clothing if you are to handle anything that may be dangerous. As my dad used to say, it’s better to be safe than sorry!

·        Resolve the leak at its source.

Determine exactly where the water leak originates. Replace or fix whatever is leaking, and make sure that any damaged or corroded components are replaced. Take the time to analyze other components that may be suspect or waiting to be your next water leak.

 Split water line

 Significant-Damage, Significant-Cost Water Leaks

Most homeowners may never have a water leak that fits into this category. These types of water leaks can be catastrophic and result in tremendous damage to your home. Frozen or burst water lines have the potential to pump hundreds of gallons of water into your home in a short amount of time. Immediate attention is required when this type of water leak is discovered.

 Basement water leak

 Where to Start

·        Turn off the main water valve.

Everyone old enough to understand should know where the main water valve is located in their home. Shut it off immediately. If the water leak is located before the main water valve, call a plumber or your city water utility company immediately. You may also want to turn off any electrical circuits in the affected area to prevent electrocution.

 ·        Document the damage.

Before you do anything else, document everything by taking photos and videos of the damage. Again, turn off any electrical circuits that may pose an electrocution hazard. Thorough documentation will go a long way towards minimizing your losses when working with your insurance company.

 ·        Contact your insurance company.

As soon as possible, contact your insurance company to report the damage. They need to know about the water issue, and they may be able to guide you to the appropriate actions and sources for remediation.

 Start the cleanup process, but don’t make any significant changes before the insurance company has had a chance to assess the damage. Ask them for directions, and make sure you wear rubber boots, gloves, and any other protective clothing and gear needed to minimize any chance of injury.

 Summary

Take immediate action if you notice a water leak in your home. Knowing the extent of a water leak and quickly mitigating the damage is an important first step.

 At HomePro Inspections, our home inspectors are trained and always look for past or active water leak issues when inspecting a home. Any issues are documented and recommended for resolution by a qualified professional.

 Visit our website to learn more or to schedule your home inspection in the Rochester, Owatonna, and Faribault, MN areas. You can contact us today at (507) 202-8942, send us an email, or utilize our online “Schedule Now” feature to set up an appointment.


Understanding Radon Gas - Where It Comes From, and What to Do About It

What is radon gas?

Radon gas is a naturally occurring byproduct produced by the breakdown of radium in the soils under and around your home. It is colorless, tasteless, and has no smell. Testing for radon gas is the only way to know if you have it in your home, and HomePro Inspections can provide thorough radon testing.

 Radon gas is considered a carcinogen by the World Health Organization (WHO). The United States EPA considers exposure to radon gas a health risk and has classified it as the number one cause of lung cancer in nonsmokers. Smokers who are exposed to radon gas are significantly more likely to develop lung cancer. You can refer to the EPA’s “A Citizens Guide to Radon” for more information.

 What is the source of radon gas?

Uranium is found in soils across most of North America. In some areas, concentrations of uranium are high due to geology and glacial deposits. Over time, uranium breaks down and decays, eventually becoming radium. As radium breaks down and decays, it gives off radon gas. Radon gas naturally rises to the surface through gaps and cracks in the soil. If you really want to dig into the uranium decay chain and how it becomes radon gas, follow this link.

The EPA has developed a map that represents the general radon zones, based on studies on the dangers of radon gas and the effects of exposure. As you can see, radon gas levels vary across the United States.

 How does radon gas get into my home?

The soil under and around our homes can contain varying levels of radiation. Radon gas can inevitably enter our homes through gaps and cracks in the basement foundations and floor slabs. The higher the concentration and the types of soils under your home, the greater the risk that you will have higher levels of radon gas within the home.

 Compared to new construction, homes built before 2000 tend to be quite drafty, and people are less likely to use basements as living spaces. New homes, built to be more energy-efficient and resistant to air leakage, now pose a greater risk of higher radon gas levels.

 The photo below is from the EPA‘s “A Citizens Guide to Radon.”

 How do I know what the radon gas levels are in my home?

By testing. Testing for radon gas is a simple and relatively inexpensive first step in determining if you have elevated radon gas levels in your home. Testing involves placing a radon measurement device in your home for at least 48 hours. We will conduct this testing under "closed conditions," which means we will close all windows and doors 12 hours before and during the testing period. You are welcome to come and go as usual, but for the majority of the testing period, we'll assume it's winter and keep the doors and windows closed.

 What if the radon gas levels are high in my home?

The EPA recommends installing a radon mitigation system in homes that measure 4.0 pCi/L (picocuries per liter). Radon mitigation systems vary depending on your home, foundation type, and radon gas measurement level. A radon mitigation company can design a system that will reduce your home’s radon gas levels, typically below 1.0 pCi/L. Just for reference, ambient radon gas levels are considered to be around 0.4 pCi/L.

 In Summary

More than 50% of the homes in Olmsted and surrounding counties have unsafe elevated levels of radon gas. Testing for radon gas is easy and is the first step in protecting your family. Once you know the radon gas levels in your home, you can decide on the best system to mitigate the radon gas if the levels are high.

 At HomePro Inspections, our home inspectors are trained to inspect all areas of the home. Your home inspection report documents any issues found and recommends their resolution by you or a qualified professional.

 Visit our website to learn more or to schedule your home inspection in the Rochester, Owatonna, and Faribault, MN areas. You can contact us today at (507) 202-8942 or by email, and you can use our convenient online “Schedule Now” feature to schedule an appointment.

Fire Hazards from Dryer Vents

The 2020 National Fire Protection Association (NFPA) statistics show that there are between 15,000 and 17,000 fires every year in the United States due to clothes washers and dryers. Clothes dryer fires injure around 380 people and are responsible for around 50 deaths per year. The leading cause (34%) of these fires is a failure to clean or replace defective dryer vents. During home inspections, our HomePro Inspections professionals have found many dryer vents that are plugged, damaged, use improper materials, or are improperly installed.

 My personal story.

Several years ago, long before I became a home inspector, my wife complained that our dryer was starting to take way too long to dry clothes. Sometimes it would take two cycles to dry jeans. She wanted a new dryer. I thought to myself, “This home is only two years old; how can the dryer be giving us problems already?” I did some troubleshooting and found the problem; the dryer was fine, but the dryer vent was completely clogged with lint.

 In my previous homes, the dryer was on an outside wall, less than a foot from the exterior. In this new 2-year-old home, the dryer was in the middle of the main floor. The dryer vent entered the wall, turned downward to the basement, turned horizontal for about 8 feet, turned horizontal again, and ran about 20 feet to where it exhausted to the exterior.

 I disassembled the dryer vent and cleaned it with a dryer vent brush. The result was about one and a half five-gallon pails full of lint. Needless to say, the dryer started to work perfectly. With this in mind, we clean the vent annually.

 The use of improper materials is a problem.

During our home inspections, we often encounter various issues that can contribute to a potential dryer fire, with improper venting materials at the top of the list.

 What is the proper dryer vent ducting material? According to the Minnesota Mechanical Code (504.6), “Exhaust ducts for domestic clothes dryers shall be constructed of metal and shall have a smooth interior finish...  and shall be a minimum nominal size of 4 inches (102mm) in diameter.”

 At the hardware or big box store, you will find a wide selection of dryer venting products. While some appear capable of doing the complete job of venting a dryer, their main function is to create transition pieces, not the entire run from the dryer to the exterior of the home.

 One kind is a “slinky-type” tube of shiny mylar material. This product can be problematic because the inner surface is corrugated (rough interior finish) and does not allow for smooth airflow. The disrupted airflow typically results in accumulated lint and eventual plugging. 

 Another product is a stretchable, flexible aluminum tube. Like the shiny mylar material, this tubing also has a rough interior finish that is susceptible to lint accumulation and plugging.

 Damaged or crushed materials will cause big problems.

The lightweight construction of the flexible tubing discussed above makes it susceptible to damage. During home inspections, we frequently discover crushed or torn venting materials behind dryers.

 Remember, these materials are meant to be used to create short transition pieces. In a situation where two metal dryer pipes don't match up, you can use one of these materials to connect them. Unfortunately, these products come in packages that contain several feet of material. Most of the time, however, instead of cutting the needed length for the transition, people just connect the ends and leave an 8-foot “anaconda” stuffed behind their dryer.

Summary

You, as a homeowner, can do your part to prevent a dryer fire from occurring in your home by performing proper installation, cleaning, and maintenance. Even if your dryer seems to be running fine right now, it’s better to be safe than sorry.

 Use only UL-approved materials, use them properly, and follow your local codes when replacing dryer vents.

 Clean the lint trap in your dryer after every load, and occasionally check the dryer vent exhaust on the exterior of your home to remove any lint or buildup. Pay attention to dryer cycle times. And, most importantly, have your dryer vents cleaned at least once annually to ensure the entire vent system is clean and lint-free.

 At HomePro Inspections, our home inspectors are trained to inspect all areas of the home. Your home inspection report documents any issues found and recommends their resolution by you or a qualified professional.

 Visit our website to learn more or to schedule your home inspection in the Rochester, Owatonna, and Faribault, MN areas. Contact us today at (507) 202-8942 or by email, and you can use our convenient online “Schedule Now” feature to schedule an appointment.


Do You Have a Tripped GFCI?

 There’s no power to any of the outlets in all your bathrooms at the same time. The fans still work, and the vanity lights work, but none of the outlets have power. What’s going on?

 This can happen on occasion and can certainly be a concern, especially if everyone is getting ready for school or work at the same time.

 Understanding your home’s electrical system and how the electrical code requires bathrooms to be wired can help. Luckily, there is usually a simple explanation and fix for this scenario that the professionals at HomePro Inspections would like to share with you.

 The basic electrical requirements for bathrooms.

In short, the International Code Council requires protection in bathrooms to prevent electrical shock. Electrical outlets in bathrooms must be on their own 20-amp circuit and protected by a Ground Fault Circuit Interrupter (GFCI). If you're unfamiliar with a GFCI, it's a specially designed outlet that aids in preventing electrocution. You can learn more about how a GFCI works here.

 The bathroom circuit only needs to have one GFCI outlet or breaker to protect all of the bathrooms. This simplifies things for the electrician but can be confusing to a homeowner. See the image below for a better understanding.

 Finding and checking the GFCI.

A tripped GFCI typically causes a loss of power in a bathroom. Knowing which bathroom, the GFCI is located in is helpful in case you need to reset it.

 Often, the electrician will install the GFCI in the master bathroom or the most commonly used bathroom. This isn’t always the case, however. Occasionally, the electrician installs it in a spot that is most convenient for them.

An orange or red light may glow on the GFCI outlet, indicating that the circuit has been tripped. The reset button will pop out. Simply press the button to reset the GFCI. You have successfully solved the problem and will be regarded as a hero by your family. Great Job!

 If you can’t identify the problem, there are other factors to consider.

If a GFCI in one of the bathrooms hasn’t tripped but the power is still off, you have a bit of detective work to do. Check every bathroom, because, at times, a previous homeowner may have installed a GFCI at every outlet. While this may sound like a good idea, multiple GFCIs are unnecessary. Only the first outlet on the circuit requires a GFCI device.

 When they first started using GFCIs, there was typically one circuit that tied the garage, bathroom(s), and exterior outlets together. If the GFCI is not in a bathroom, it may be in the garage.

 As with all things, GFCIs are also prone to failure. Over time, exposure to high moisture, such as hot, steamy showers or high outdoor humidity, may cause a GFCI to not reset after tripping. A GFCI that doesn’t reset will have to be replaced. 

 You may also have to check the electrical panel.

If you can't locate a tripped GFCI, it's possible that the bathroom breaker in the panel has tripped. Hopefully, during installation, the installer correctly labeled your breakers.

 If you find a tripped breaker, you can reset it by flipping the switch to the off position and then back to the on position. If it resets, you should have power back to the bathroom circuit.

 In newer homes, there’s a chance there are no GFCI outlets in any of the bathrooms. The GFCI may be part of the breaker itself. In this case, you will see a yellow button next to the switch on the 20-amp bathroom breaker. The yellow button is the test button. If the breaker has tripped, you must reset the breaker as previously described.

 During the home inspection, we test and reset all GFCIs and evaluate the electrical panel. Your home inspector will describe the basics of the GFCIs, the types of breakers in your panel, and what they do.

 If all else fails, call a professional electrician.

If there’s no power to any of the bathroom outlets, but the panel has power, you’ve checked every outlet, and no breakers have tripped, it’s time to call a professional electrician. When solving the problem and fixing it are outside of your skill set, an electrician can do the required and proper testing, repairs, and replacement of defective outlets and breakers.

 At HomePro Inspections, our home inspectors are trained to inspect all areas of the home. Your home inspection report documents any issues found and recommends their resolution by you or a qualified professional.

 Visit our website to learn more or to schedule your home inspection in the Rochester, Owatonna, and Faribault, MN areas. Contact us today at (507) 202-8942 or by email, and you can use our convenient online “Schedule Now” feature to schedule an appointment.

Are Carbon Monoxide Alarms Required in My Home?

The simple answer is “yes.” Currently, Minnesota Statue 299F.50 states, “Every single-family dwelling and every dwelling unit in a multifamily dwelling must have an approved and operational carbon monoxide (CO) alarm installed within ten feet of each room lawfully used for sleeping purposes.” Newer construction homes typically have alarms installed in the appropriate locations. The inspectors at HomePro Inspections, however, have heard many misconceptions and misunderstandings surrounding the use of CO alarms in existing homes. Let me explain.

 Carbon Monoxide

Combustible (fuel-fired) appliances in your home generate carbon monoxide (CO), an odorless, tasteless, and invisible gas. Low exposure levels to carbon monoxide can make you feel tired or sick, while higher levels of exposure can result in death. 

 Individuals with the highest risk of carbon monoxide exposure are the elderly, unborn babies, and small children. People with respiratory problems, heart conditions, anemia, and immunity issues are also at a higher risk of death due to exposure to carbon monoxide.

 The Difference Between Carbon Monoxide (CO) and Carbon Dioxide (CO2)

One carbon atom and one oxygen atom make up carbon monoxide, hence the designation CO. People often incorrectly refer to carbon monoxide as CO2. CO2 is carbon dioxide, which has one carbon atom and two oxygen atoms. CO2 is the gas we exhale. It is also used to make pop and other beverages fizzy. Remember, carbon monoxide is abbreviated as CO. Our home inspectors can discuss this difference at your home inspection.

 CO Alarm versus CO Detector

A CO alarm, the device typically placed in a home, has its own power source and sounds an alarm that alerts inhabitants to elevated CO levels. A CO detector is basically the same type of device, but it may or may not include an audible alarm function.

 A CO detector is a common tool a home inspector uses to determine if furnaces, water heaters, fireplaces, etc., potentially leak CO into the living space. We also use a device to measure the air-free carbon monoxide levels in your furnace discharge vent to detect potential combustion issues, such as a cracked heat exchanger.

 Minnesota Carbon Monoxide Codes and Statutes

Minnesota Carbon Monoxide Codes and Statutes

There’s a lot of code language involved, so let me summarize the basics. A device must be

·         listed in accordance to UL 2034.

·         installed in new homes that utilize fuel-fired appliances.

·         installed when there’s an attached garage with an opening to the living space.

·         added to existing homes when listed additions, alterations, or repairs are made.

·         located on every level and within 10 feet of sleeping areas.

·         located within the sleeping area if a fuel-fired appliance is present.

Also,

·         Combination smoke/CO alarms are acceptable.

·         Unless retrofitting, an alarm must be hardwired.

If you have multiple alarms, you must interconnect them, unless you are retrofitting

 Carbon Monoxide Alarms

Again, this is just a summary. Read the full carbon monoxide code requirements and statutes:

·         You can find Minnesota’s carbon monoxide code requirements here:

·         Section R315 of the MN Residential Code.

·         The Minnesota carbon monoxide statutes can be found here:

·         Sections 299F.50 and 299F.51

·         For additional EPA guidance regarding carbon monoxide alarms, click on the following:

·         What about carbon monoxide detectors?

·         Where should I place a carbon monoxide detector?

 Summary

Tragically, the absence of carbon monoxide alarms continues to cause deaths every year. These devices are easy to acquire and install, and they are required to help keep us alive. For your family's safety, ensure you have them properly installed and replaced if they are old or not functioning. Check your carbon monoxide alarms to ensure they are not past their service life. Our home inspectors will recommend replacing your carbon monoxide alarms if they are more than 7 years old. Manufacturers recommend 7 to 10 years.

 Also, be aware of the warning signs of carbon monoxide poisoning, such as headaches, dizziness, feeling sick, and/or lack of energy. Low levels of carbon monoxide in small areas may cause these symptoms in some people before the alarm alerts them to a bigger problem.

 At HomePro Inspections, our home inspectors are trained to inspect all areas of the home. Your home inspection report documents any issues found and recommends their resolution by you or a qualified professional.

 Visit our website to learn more or to schedule your home inspection in the Rochester, Owatonna, and Faribault, MN areas. You can contact us today at (507) 202-8942 or use our online “Schedule Now” feature to schedule an appointment.

Do I Need to Test for Radon If I Have a Passive Radon System in My Home?

When it comes to radon mitigation systems, it is important for you to know if the system in your home is passive or active. If you have concerns about whether or not your home’s system is properly reducing radon levels, the professionals at HomePro Inspections want you to know that radon testing is the only way to make that qualified determination.

 Since 2009, Minnesota has required that all new homes be built to be radon-resistant. New home construction must use techniques and materials to help reduce or prevent radon from entering the home. A passive system relies on the natural upward thermal flow of sub-slab air and soil gases through a pipe to the home's exterior.

 What is a passive radon mitigation system?

A passive system starts with a perforated tile system set in permeable soil, such as gravel or pea rock, which is covered and sealed with plastic before the concrete floor is poured. Typically, a three- or four-inch PVC pipe vents the system. The PVC pipe extends from beneath the concrete slab, up through the house and attic space, to the exterior of the home. Based on the thermal stack effect, the system will naturally draw air upward. The home acts as a vacuum on the soil due to internal and external temperature differences. There are many factors, including weather, storms, winds, barometric pressure, type of construction, and so on, but that’s another discussion best left for another time.

 Why would my passive radon system not be enough?

Radon, a radioactive gas that is generated from the naturally occurring process of uranium decay, is found everywhere in Minnesota. Generally, a home with a passive radon system experiences high radon readings due to three factors. They include pressure differences between the inside and outside of the house, the way radon enters the house through the soil, and the soil's actual radon level.

 On occasion, the construction process unintentionally obstructs a system. An unobstructed system is critical for adequate and consistent airflow under the slab.

 To help understand variations in radon levels, I’ll use my house, a one-story slab on grade in 2017, as an example. I oversaw the installation of the passive radon system and can confirm it was done correctly. After living in my home for a few months, I tested the radon gas levels, and they came in at an average reading of 3.2 pCi/l to 3.8 pCi/l, depending on the season. This is pretty close to the EPA action level of 4.0 pCi/l.

 Does this imply that the construction of my home's passive radon system was incorrect? No. It means that the emanation of radon gas from the soils below my home is greater than what the passive system can handle. I’m sure there are cold and windy winter days where the average is above 4.0 pCi/l.

 The question that begs to be asked is whether a system is working well enough. In my example, the radon measurements are below 4.0 pCi/l, so some may say yes, the system is working as designed. However, some may answer no because the radon average measures pretty close to 4.0 pCi/l. If experience has taught us anything, it’s that even the best-designed and installed passive system may not be adequate to remove radon gas from all homes in Minnesota.

 Summary

A passive radon mitigation system does not always guarantee that your home is safe from dangerous radon gas levels, and the only way to accurately determine the radon levels in your home is to have it tested. HomePro Inspections employs the licensed and certified professionals necessary to guarantee accurate radon testing and adherence to all testing protocols.

At HomePro Inspections, our home inspectors are trained to inspect all areas of the home. Your home inspection report documents any issues found and recommends their resolution by you or a qualified professional.

 Visit our website to learn more or to schedule your home inspection in the Rochester, Owatonna, and Faribault, MN areas. Contact us today at (507) 202-8942, by email, or by using our convenient online “Schedule Now” feature to schedule an appointment.


Should a Homebuyer Waive the Home Inspection? Risks Explained by Your Rochester, MN Home Inspector

Here’s the story.

In this competitive market, homebuyers are overwhelmed and exhausted by the home-buying process, even before they buy a house. Because of low inventory, sellers see multiple offers on their homes when they list them. This is good for the seller but bad for the homebuyer. There’s a trend that the inspectors at HomePro Inspections have noticed: many homebuyers, in an attempt to make their offer look as good as possible, are offering way more than the asking price and waiving any home inspection contingencies. While this strategy may sound reasonable, it can create a host of potential problems and future expenses for the homebuyer.

 Your home is most likely the largest purchase you will ever make.

First-time homebuyers can sometimes be grossly unprepared for homeownership and what awaits them after buying a home. New homebuyers sometimes forget that when something breaks, there is no landlord to call; it’s not mom and dad’s house; it’s on you to fix any problems that arise.

Paying more than the asking price and waiving the home inspection can add to the financial burden and increase the risk of unexpected or latent repair costs. While a professional home inspector does not guarantee that everything will be perfect, a home inspection will greatly reduce the risk of unexpected surprises.

The risks of waiving the home inspection can be many.

An article by msn.com states that 77% of homebuyers face unexpected repair costs in their first year of ownership.

 A half-hour showing or walkthrough with your dad or uncle, “who knows things about construction,” doesn’t provide you with a complete and overall objective condition of the home. I’m not knocking dads and uncles, but I have seen dads who work in the construction business point out everything that’s “not up to code.” That’s fine, but it’s irrelevant for every home except brand-new construction. Why? As construction materials and practices continue to evolve, so do the codes that pertain to them. On average, codes change about every three years. That is why perceived code compliance is not part of a home inspection. 

 Spending a few hundred dollars on a home inspection and a few hours with a home inspector will open your eyes to potential safety, health, and financial risks associated with purchasing a new home. Home inspectors have the knowledge and tools to provide an honest, non-biased condition of the home on inspection day.

 There is another method to consider to get a seller to agree to a home inspection.

There are ways around waiving a home inspection contingency without losing an offer. One option is to present your offer to include a home inspection “for informational purposes only.” This does not hold the seller responsible for any repairs or costs, which can help make them more receptive to your offer. If there are any major issues pointed out by your home inspector, you can still back out if your realtor has worded your contract appropriately.

 There are numerous benefits to having a “Walk and Talk” consultation.

We offer a one-hour consultation called “Walk and Talk.” Your home inspector will walk through the home, looking for anything major. You bring your own camera and notepad. It’s like bringing your dad to look at the house, except it is with a home inspector. We also share advice and point out maintenance items you may want to address.

 A post-sale inspection is also an option.

A post-purchase inspection is another option we see from homebuyers. After the home inspection, your home inspector will help you understand the report by explaining any noted issues or listed required repairs.

 The bottom line is that spending a few hundred dollars, whether part of your contingency or not, is always a wise investment in home ownership. No one wants to buy a money pit. Even if there are no major issues, you may learn about basic home maintenance, what makes your home tick, and maybe even create a little “honey do” list.

 At HomePro Inspections, our home inspectors are trained to inspect all areas of the home. Any issues found are documented in your home inspection report and recommended for resolution by yourself or a qualified professional.

 Visit our website to learn more or to schedule your home inspection in the Rochester, Owatonna, and Faribault, MN areas. You can contact us today at (507) 202-8942 or by email, and you can use our convenient online “Schedule Now” feature to schedule an appointment.

Will Closing Air Vents Help Cool Other Rooms?

Many misconceptions about home ownership have developed over time. Some are carryovers from the past and don’t account for our modern and more sophisticated heating and cooling systems. Closing air vents in one part of the house or in a room may seem like a good way to manage the conditioned air in your home, but you may potentially damage your HVAC system. The professionals at HomePro Inspections offer the following information for you to consider before you change the air distribution in your home by closing air vents.

 An air vent located on the floor

 What are air vents for?

Your home may have air vents in various places. Some may be located on the floor or near the ceiling. Regardless of where they are located, they are there to supply air to the rooms in your home.

 Adequate air circulation throughout your home plays a big part in managing your home's moisture and humidity levels during the hot and humid summer. Keeping your air vents open as designed is key to allowing your HVAC system to work efficiently and as intended.

 Can closing your vents cause damage?

It's not a good idea to try to control air flow in your home by closing air vents. Creating an imbalance can have unintended consequences and damage your HVAC system.

Damage to AC cooling coils—Restricting airflow by closing your vents will back up cold air in the air duct system, which may cause your air conditioning coils to freeze and damage your A/C system.

 Damage to ductwork—Pressure can build up in your ductwork and prevent proper airflow. Static pressures may result in leaks and openings in your ductwork. Leaks prevent conditioned air from getting to where you want it to go.

 Reduced energy efficiency—Closed vents cause air pressure to buildup, which can redirect airflow to other parts of your home. Conditioned air that leaks into spaces like attics and crawlspaces wastes energy and reduces efficiency.

 Carbon Monoxide—Pressure and heat build-up during the heating season could cause a cracked heat exchanger, which can leak carbon monoxide into your home.

 As home inspectors, we encounter some of these scenarios during a home inspection. A story I share with my clients helps to illustrate how closing events can be a problem.

 When inspecting the home, I occasionally walk into the basement and notice it is cold, damp, or musty-smelling, and the air feels thick with humidity. During the summer, when it is humid, that cold air will hold a lot of moisture. Closing the basement vents prevents the air from circulating through the air conditioning system, causing the air to stagnate. Since cold air is denser than warm air, it has to find its way upstairs and into an air return on the main floor, which is difficult and very inefficient.

 People close vents in the basement because they feel it is too cold, and they don't need the air conditioning downstairs as much as they do upstairs. Closing the vents, however, can create other problems. High humidity can lead to potential organic growth, such as mildew or mold. Carpeting and other surfaces in the basement will feel damp and uncomfortable.

 Summary

Your HVAC system is designed to provide conditioned air throughout the home, and altering that flow can lead to issues and potential problems. If you are experiencing areas of discomfort in your home, it may be best to contact a professional to check the HVAC system and ensure it is running properly and moving air efficiently throughout the entire house.

 At HomePro Inspections, our home inspectors are trained to inspect all areas of the home. Any issues found are documented in your home inspection report and recommended for resolution by yourself or a qualified professional.

 Visit our website to learn more or to schedule your home inspection in the Rochester, Owatonna, and Faribault, MN areas. You can contact us today at (507) 202-8942 or by email, and you can use our convenient online “Schedule Now” feature to schedule an appointment.

Resolving a Water Heater Leak

Once in a while, our home inspectors come across a leaking water heater during a home inspection. What we typically find are leaks at one of three locations: at the temperature pressure relief valve, at the bottom (which may indicate corrosion within the water heater tank), or at the water heater's incoming and outgoing water lines. Regardless of the cause, it’s crucial to repair a leak as soon as possible to avoid damage to the water heater and its surroundings.

 The water heater’s temperature pressure relief valve is leaking.

 Why is my water heater leaking?

A modern water heater's average life expectancy is between 8 and 12 years, but we’ve seen water heaters fail in the five- to six-year range. Recently, I did an inspection, and a water heater from 1987 was still functioning properly and not leaking. Below are some points to help guide you through determining the source of a leak and potentially how to fix it.

 Age and high water pressure are the most common reasons for a water heater to start leaking. Over time, mineral deposits build up in your water heater and cause tank corrosion. High water pressure can also cause valves to weaken and leak over time. Other times, internal components or water lines can fail due to age.

 First, shut off all sources of energy.

Before you start working on your water heater, it is a good idea to shut off all energy sources. Turn off the water heater water supply valve, disconnect the electrical power, and turn off the gas valve. These should all be within reach of your water heater.

 Most water heaters will have a valve at the supply side that you can close to shut off the water source. There should also be a gas valve close to the gas controller on your water heater. If your water heater is electric or has a forced draft blower, it will either have an electrical switch or connect directly to a wall outlet.

 Do you need to drain the water heater?

If your water leak is substantial, you will want to drain your water heater to prevent further leakage or water damage. There is a drain valve at the bottom of your water heater. Hook up a garden hose and run it to a floor drain or the exterior of your home. Draining your water heater should be part of your annual maintenance program. It will allow the removal of any loose sediment at the bottom of the tank.

 Determining the source of your water heater leak.

If the water heater is leaking at the bottom or if you only see water on the floor or in the drain pan below it, it may be old, and the tank may be rusted. A leaking tank means that you will need to replace your water heater.

The water heater tank is leaking onto the floor.

 Check the Temperature Pressure Relief Valve (TPRV).

If your water leak is coming from the temperature pressure relief valve, there are a couple of things you can try. Occasionally, a piece of debris may get stuck in the valve and not allow it to close completely. You can open and close the valve several times to see if it seals.

Temperature Pressure Relief Valve

 If the valve does not seal, you must replace the TPRV. This is a relatively simple procedure, but you may want to hire a plumber.

 What if the water heater’s water supply inlet or outlet pipes are leaking?

Sometimes, the inlet and outlet water supply pipes will leak. Typically, these connections have to be redone to stop the leak. Hire a plumber if you are uncomfortable working with water lines.

 Leaking inlet/outlet water lines.

 Water leaking from the drain valve is a concern.

As mentioned earlier, your water heater has a drain valve. Similar to the temperature pressure relief valve, this seal can sometimes catch a small piece of debris and not seal properly. Open and close the valve several times to try to get it to seal properly. If it does not seal, you may want to replace the valve. Again, you may want to hire a plumber if you are uncomfortable doing it yourself.

 Annual water heater maintenance is essential.

Drain your water heater annually. As stated before, your water heater can be drained by attaching a garden hose to the valve and routing it to a floor drain or to the exterior of your home. Draining your water heater will help flush out any sediment on the bottom of the tank and reduce the probability of corrosion.

 Check your temperature pressure relief valve and discharge tube; the discharge tube attached to your temperature pressure relief valve typically terminates within 12 inches of the floor. Inspect the bottom of the tube for any water and/or leaks on the floor.

Water heater discharge tube and drain valve.

 Summary

Leaks in water heaters are common and, in most cases, easy to fix. However, if you cannot fix your leaks, you may need to replace your water heater.

 At HomePro Inspections, our home inspectors are trained to inspect all areas of the home. Any issues found are documented in your home inspection report and recommended for resolution by yourself or a qualified professional.

 Visit our website to learn more or to schedule your home inspection in the Rochester, Owatonna, and Faribault, MN areas. You can contact us today at (507) 202-8942or by email, and you can use our convenient online “Schedule Now” feature to schedule an appointment.